Scaleway星尘#无限流量月付0.38欧IPv6-Only小鸡 + 75G对象存储
date
May 3, 2022
slug
vps-scaleway-ipv6-less-than-5o
status
Published
summary
新vps
tags
vps
type
Post
URL
结论Acquisition下载CLIlist image labelsCFWarp for IPv6 Onlyif in debian debian_bullseyeCloudFlare - 设立AAAA,并打开Proxy(小云朵)各种测试机器配置 + 测速yabs - cpu测试流媒体回程可选YoutubeSpeedtest测速下午4点夜里3点75G对象存储
结论
- 本地有可能是ssh不上的,这就要找一台有native ipv6的vps作为跳转机,把key拷过去,从挑战机再ssh到目标机
- 安装的aapanel可能无法用8080,改成8880就好了
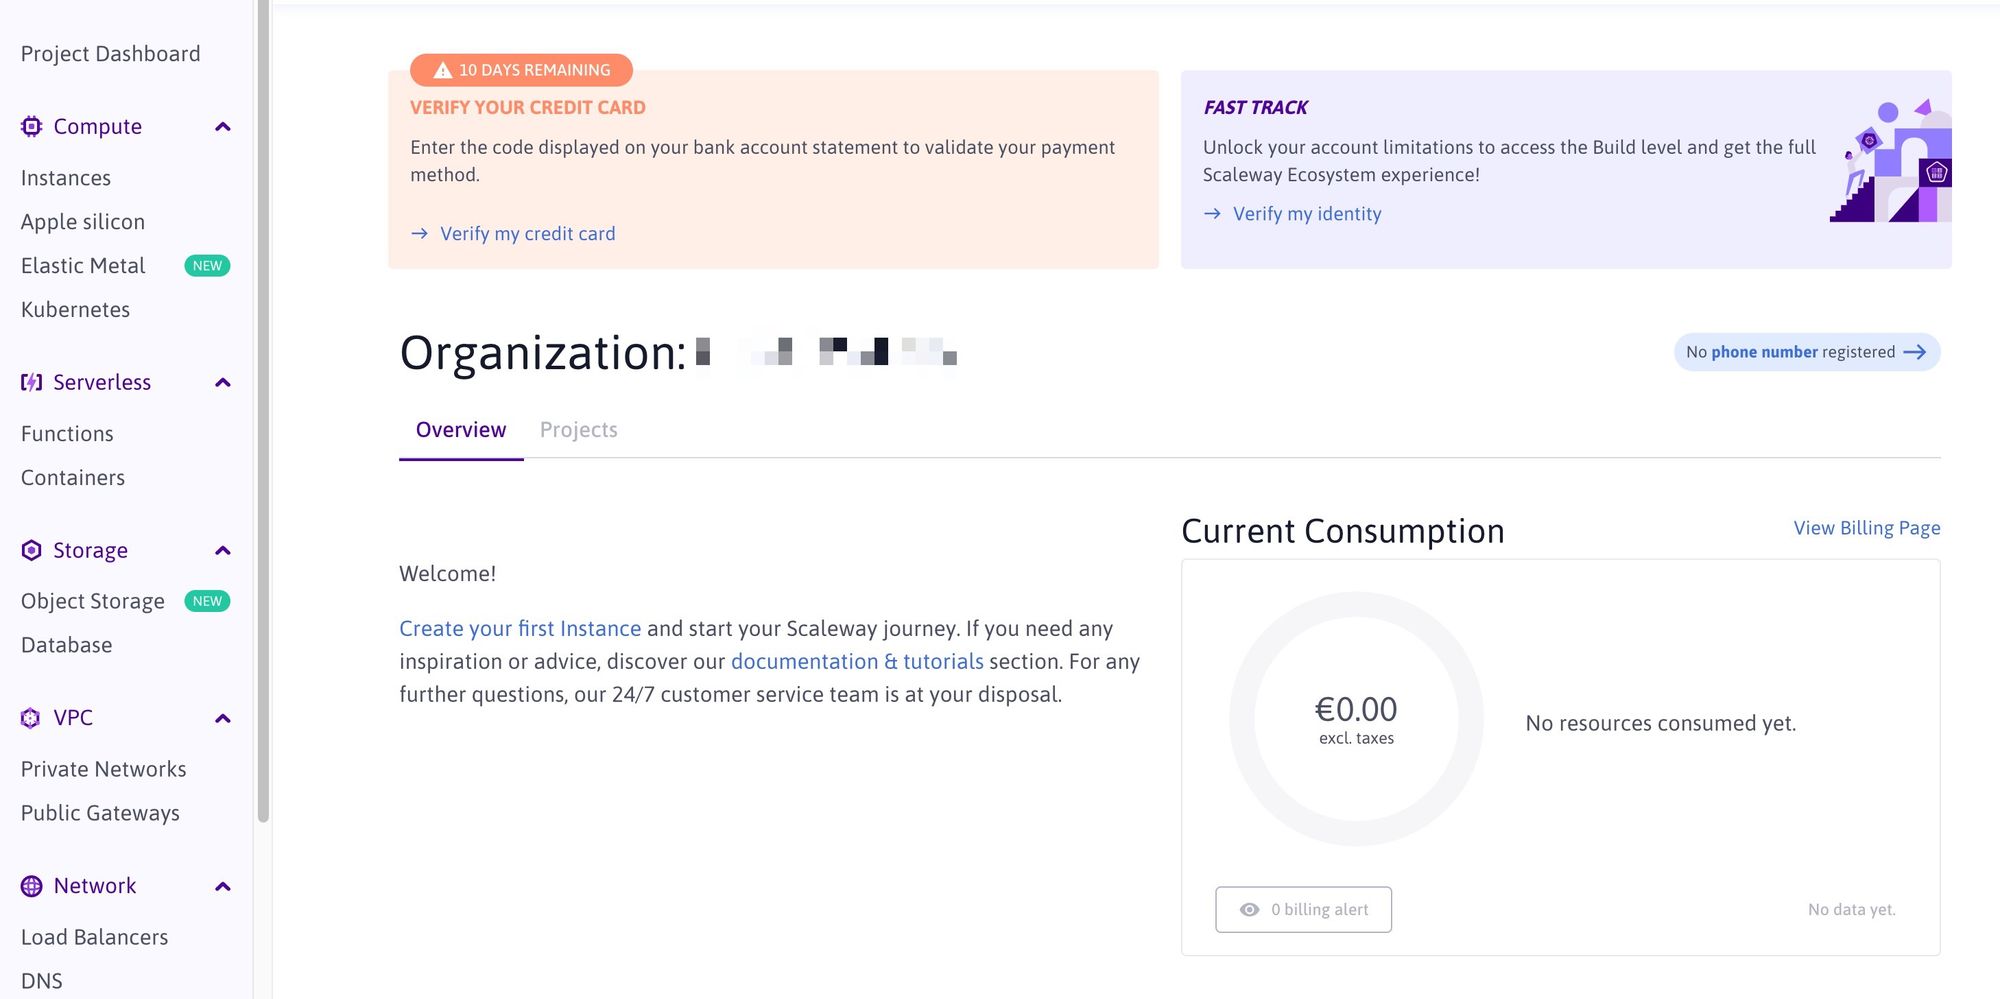
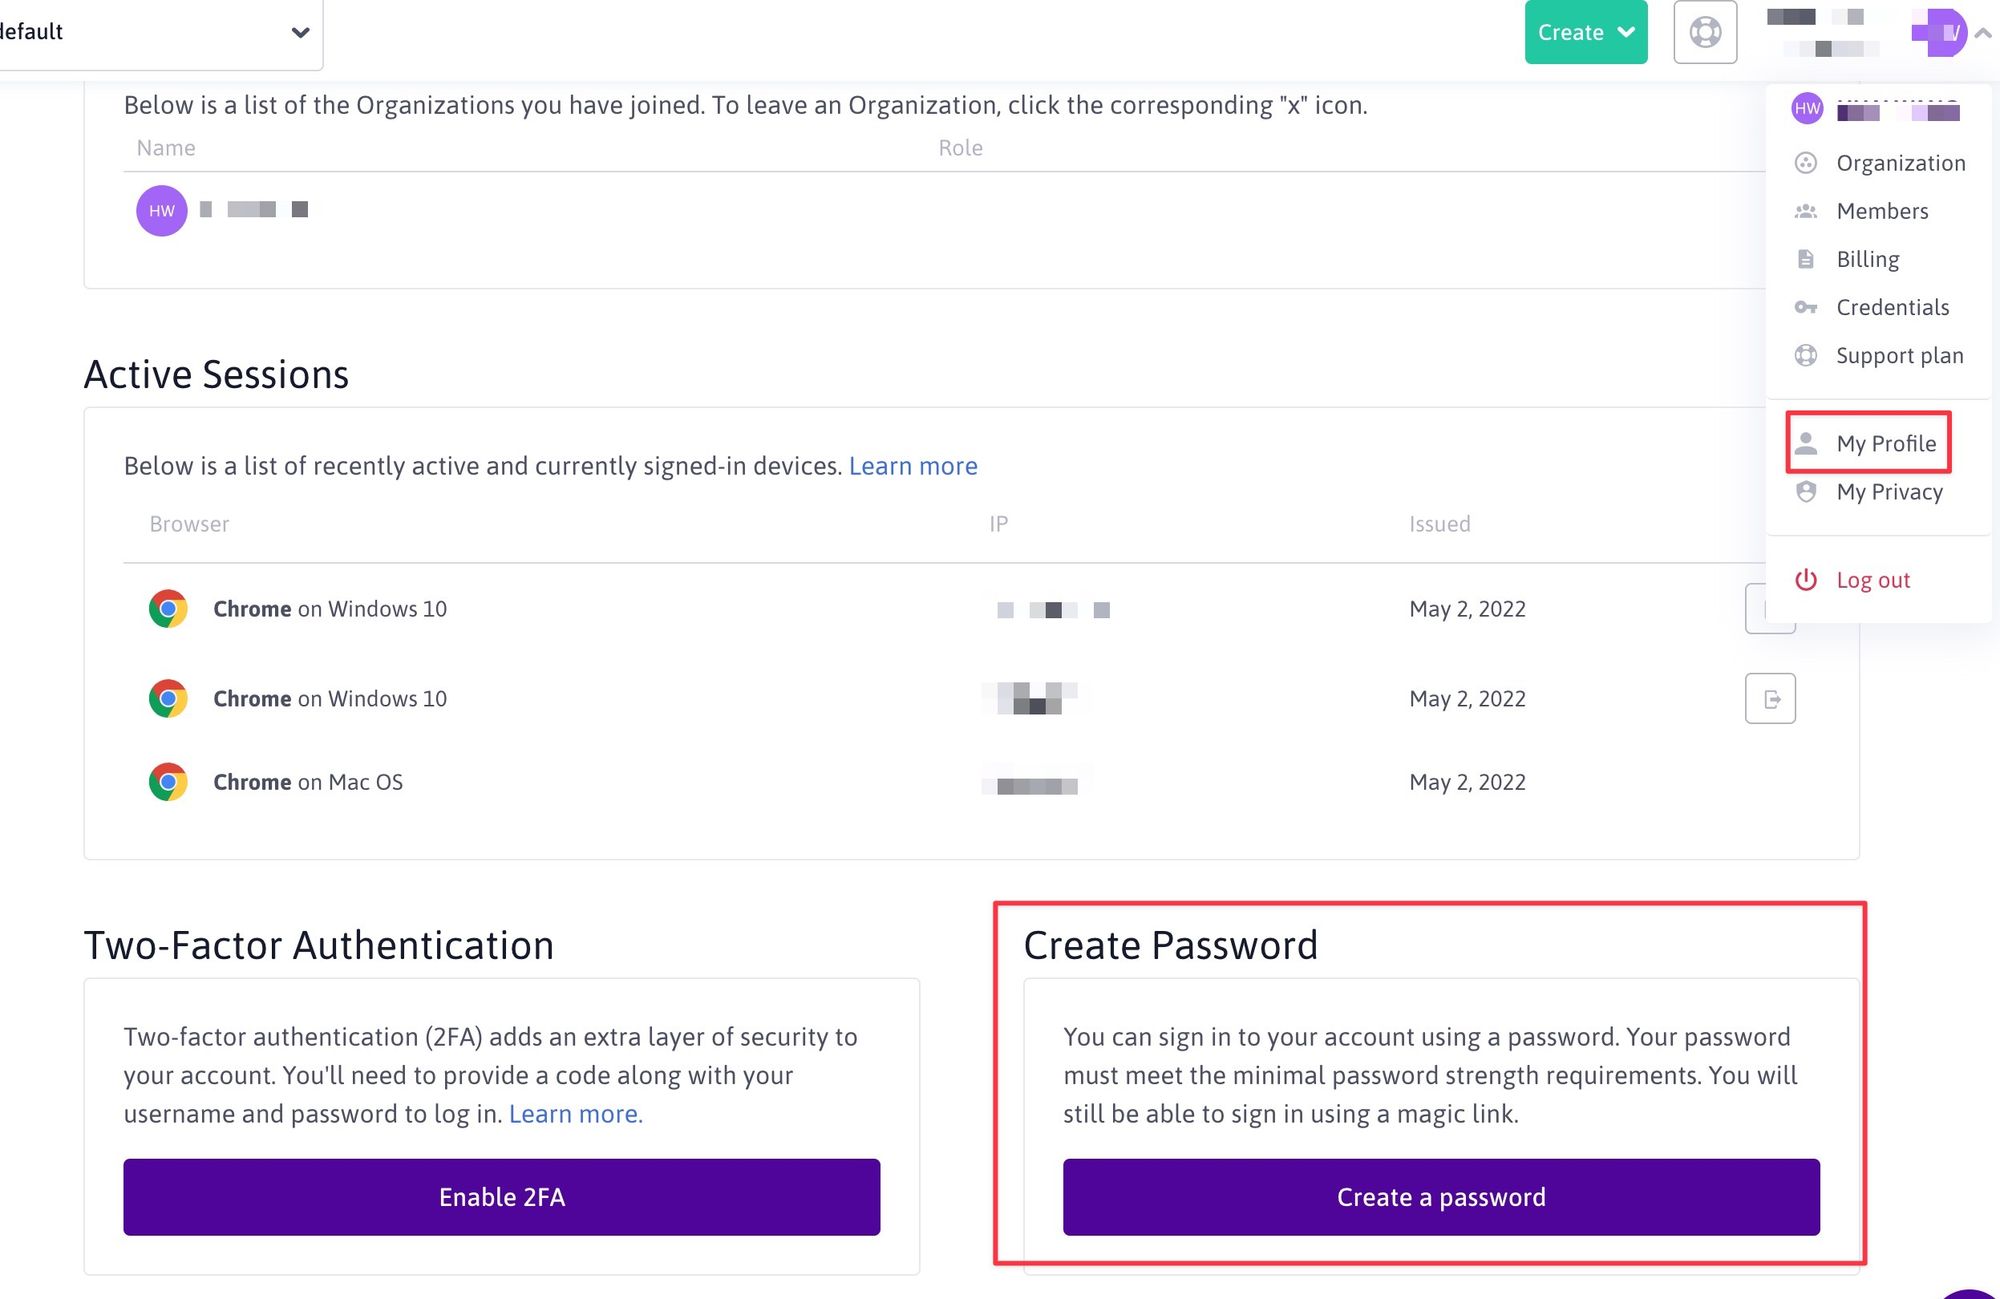
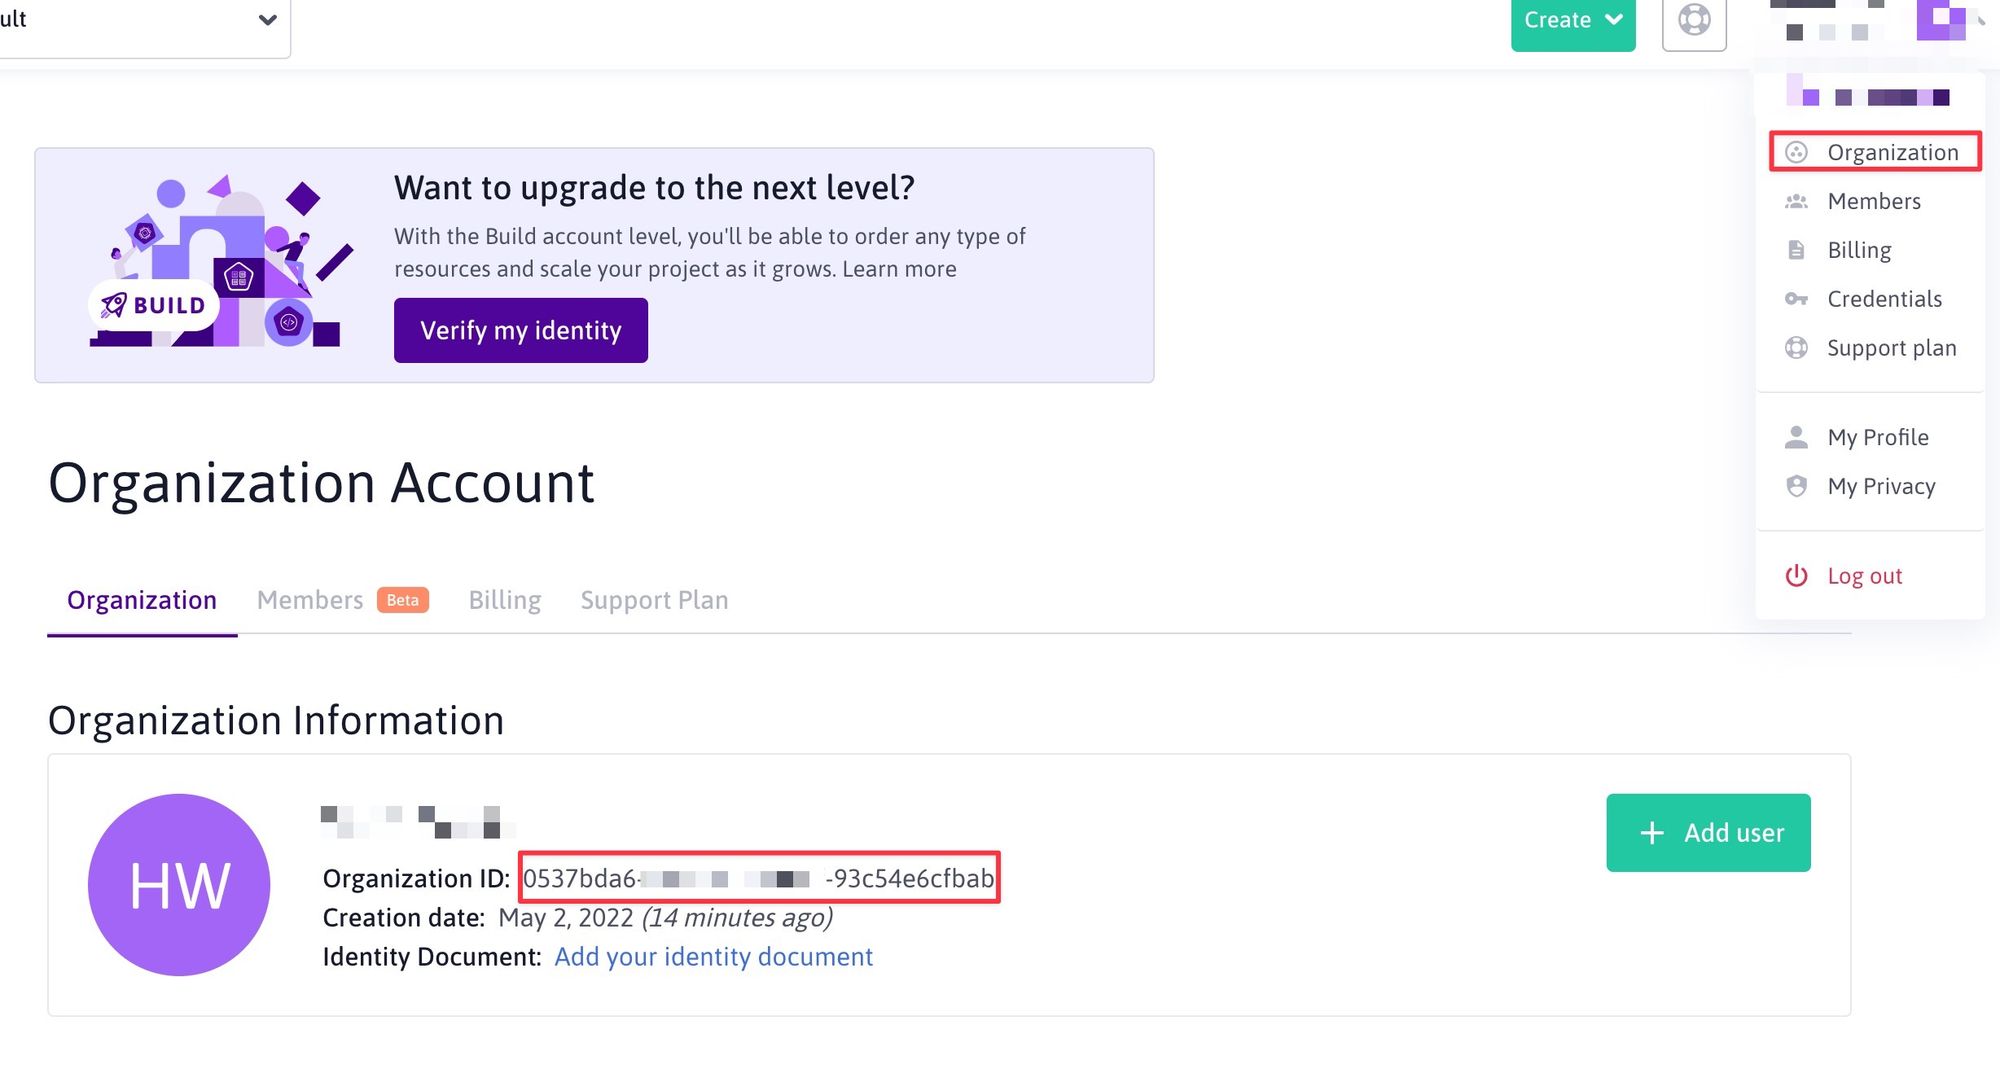
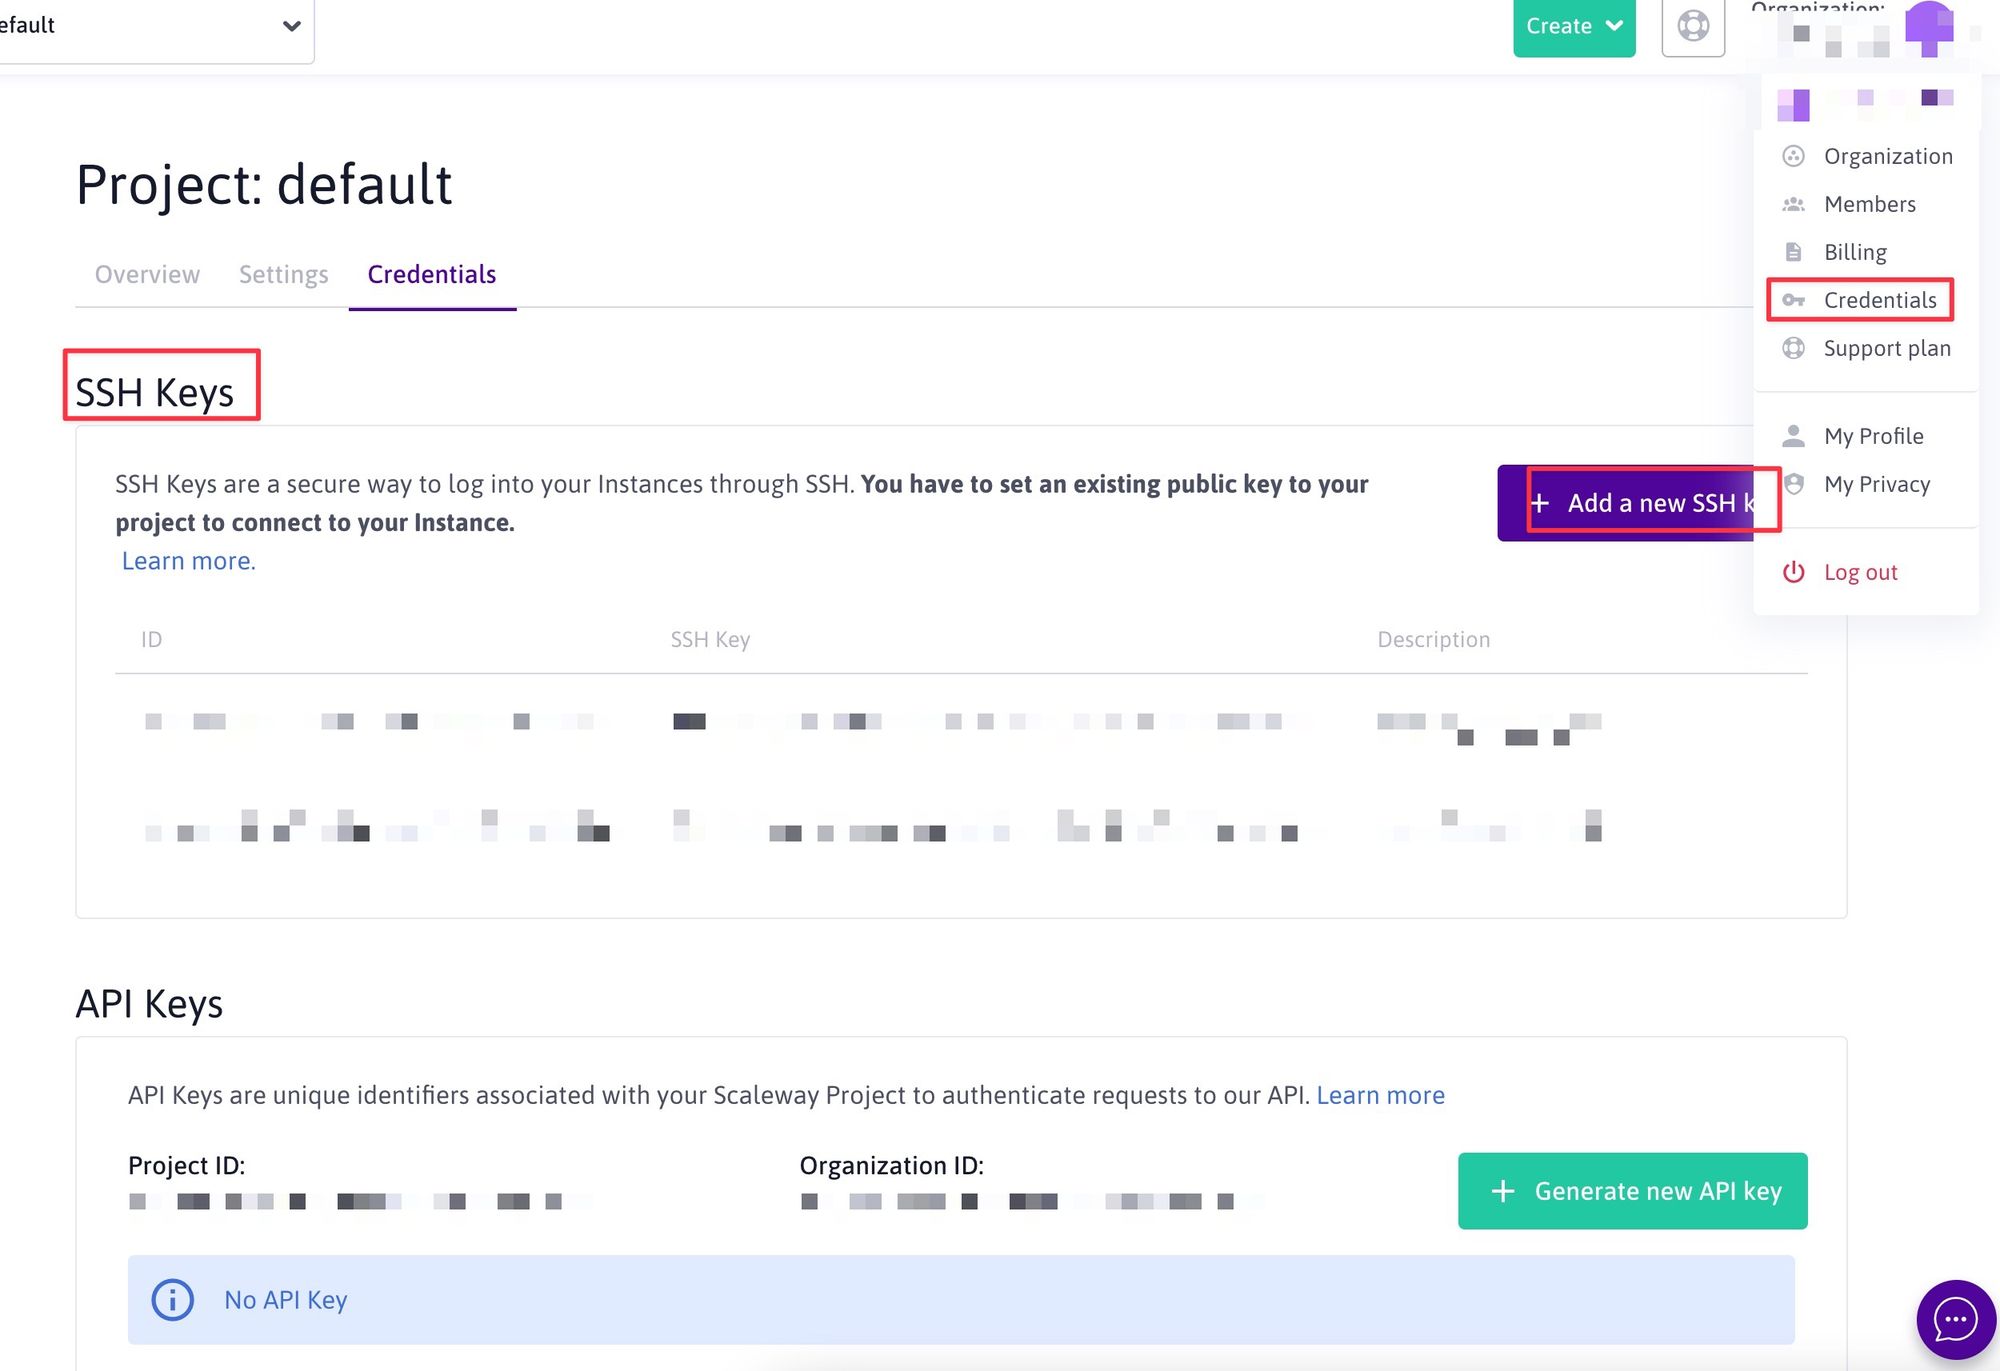
Acquisition
- 这里写的非常详细 https://www.moe.am/3494.html

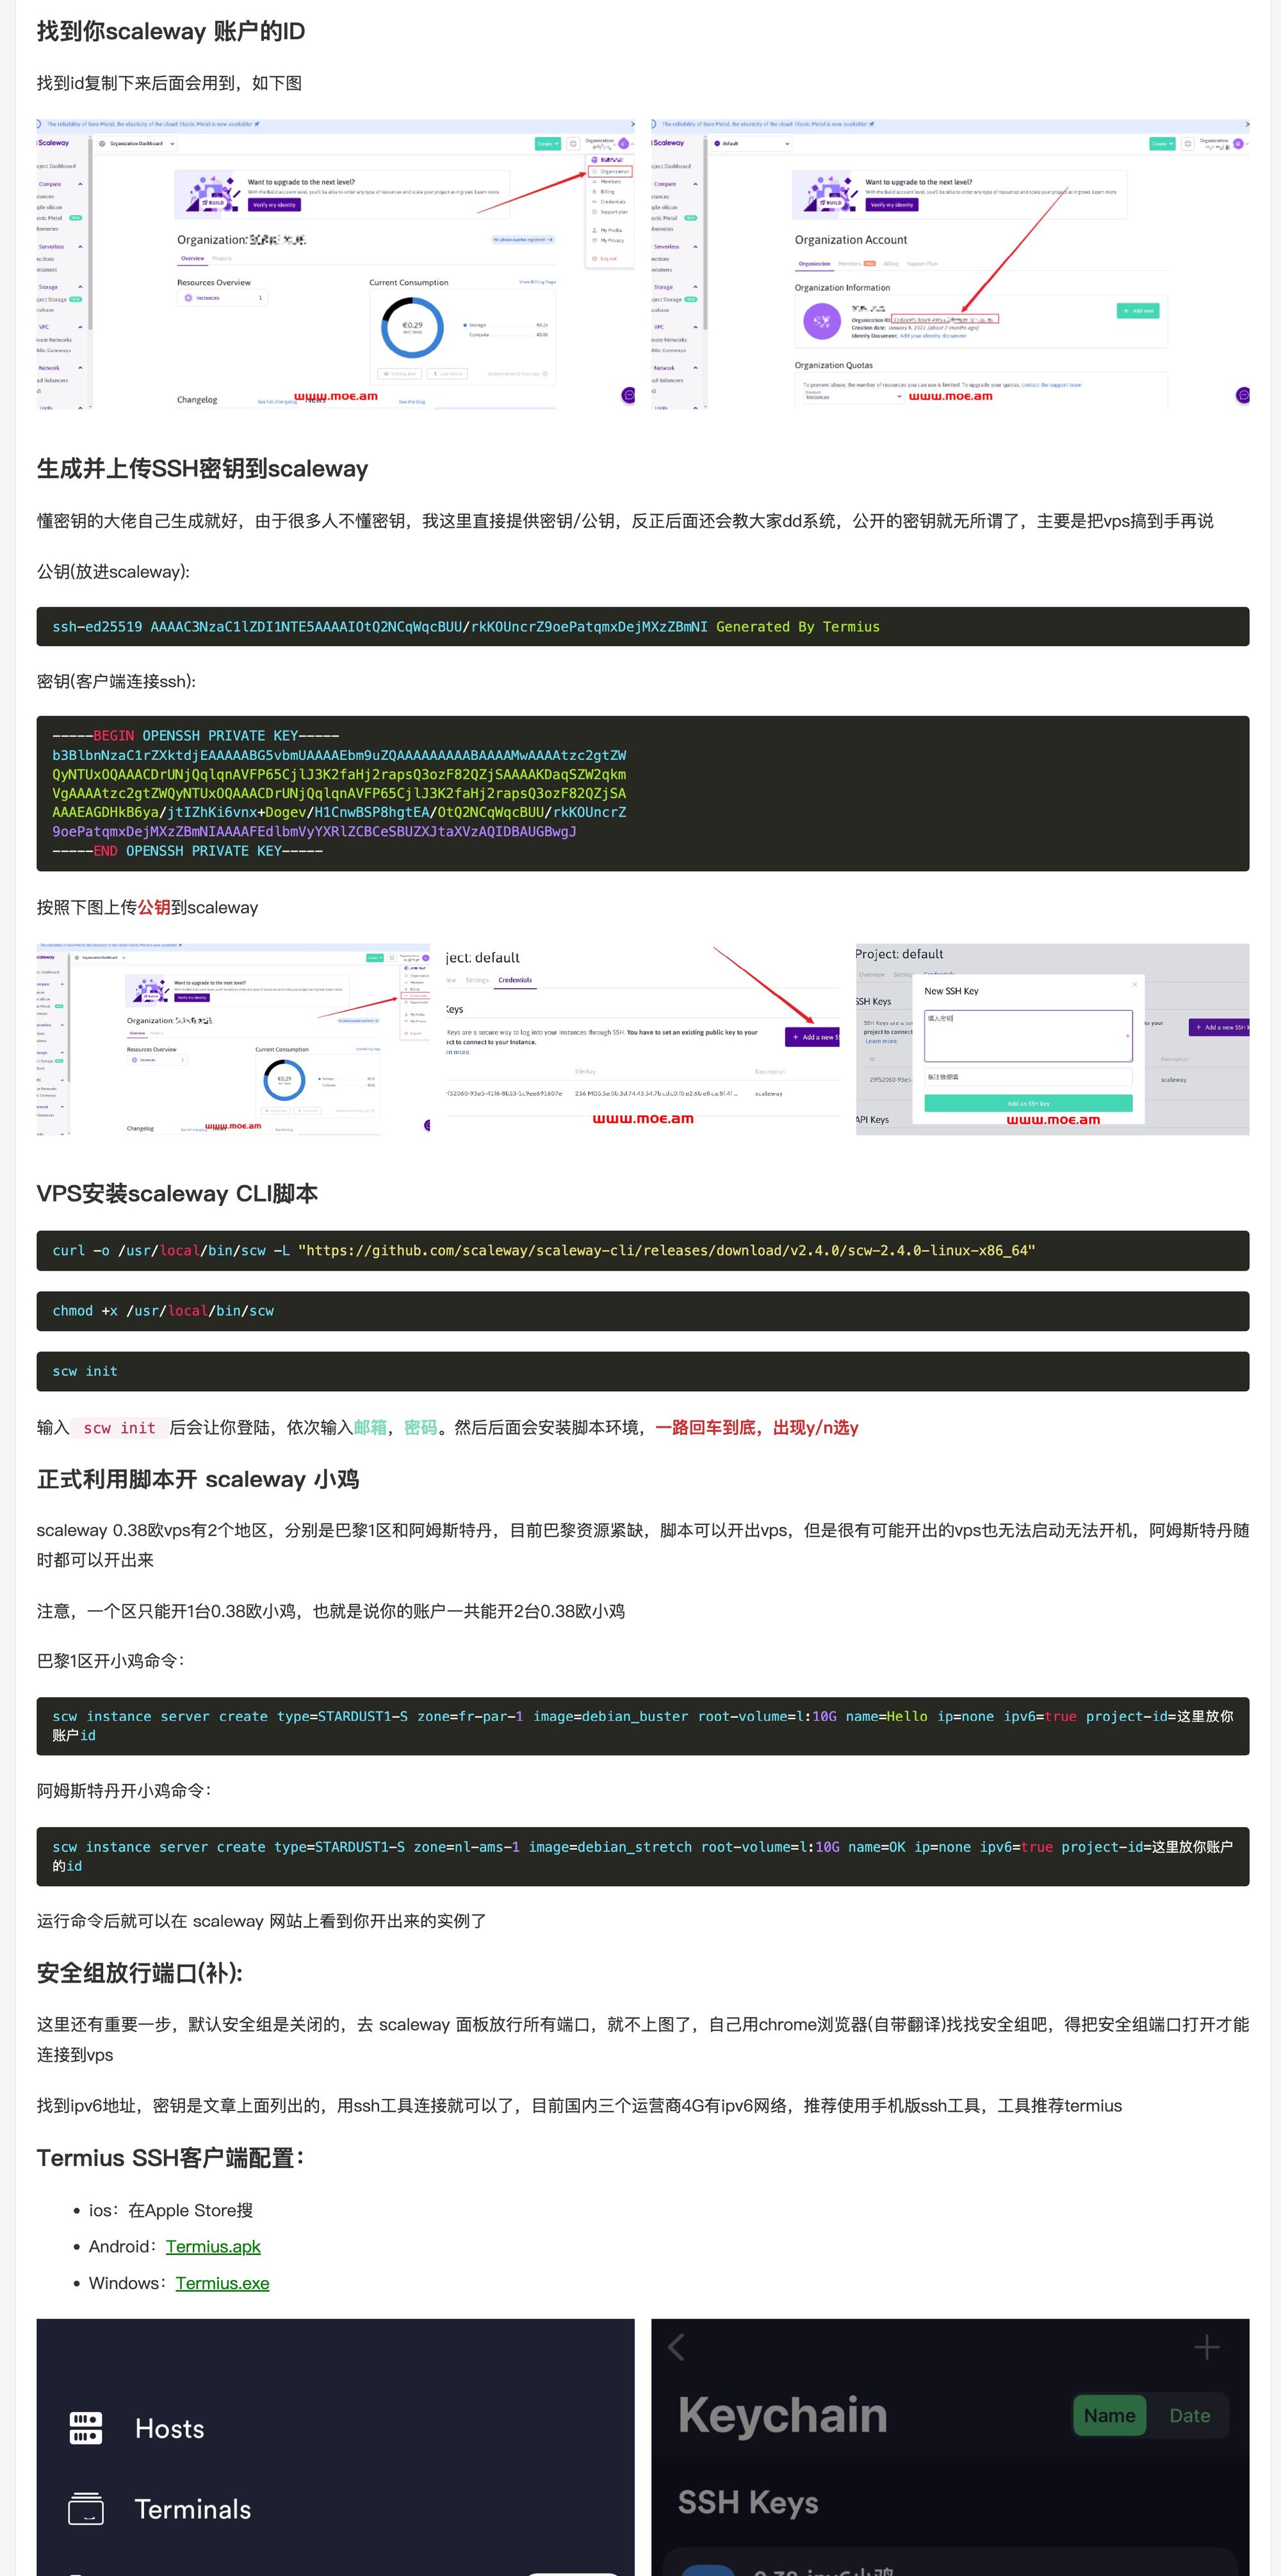


下载CLI
#curl -o /usr/local/bin/scw -L "https://github.com/scaleway/scaleway-cli/releases/download/v2.4.0/scw-2.4.0-linux-x86_64"
# amd @ mac
curl -o ~/bin/scw -L "https://github.com/scaleway/scaleway-cli/releases/download/v2.5.1/scaleway-cli_2.5.1_darwin_amd64"
# arm, m1, m2 chip @ mac
curl -o ~/bin/scw -L "https://github.com/scaleway/scaleway-cli/releases/download/v2.14.0/scaleway-cli_2.14.0_darwin_arm64"
chmod +x ~/bin/scw
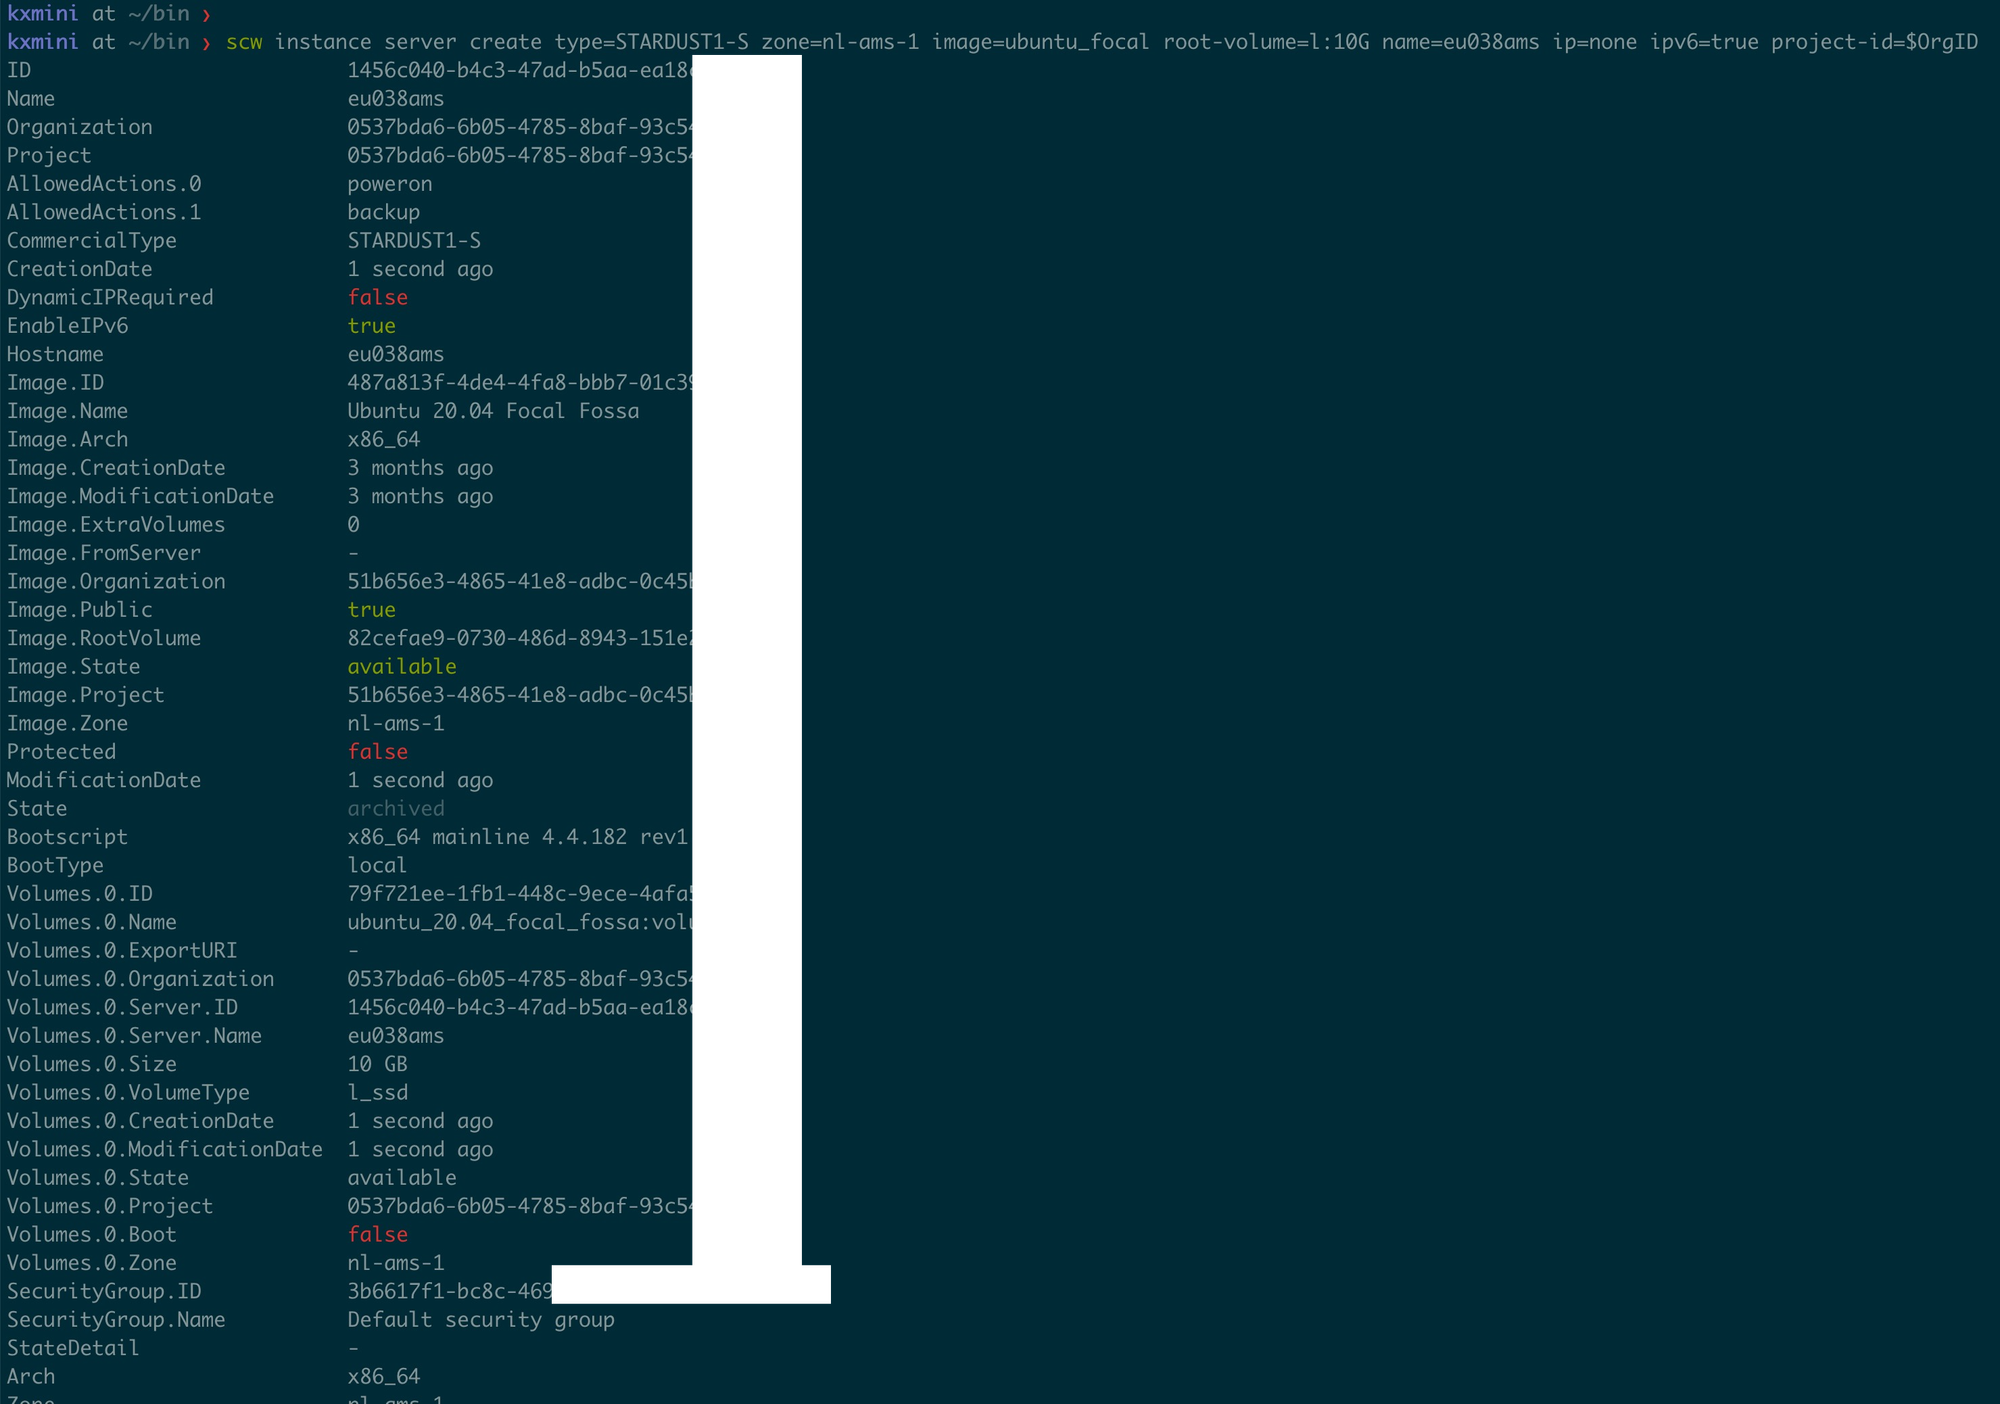
# 开荷兰
scw instance server create type=STARDUST1-S zone=nl-ams-1 image=ubuntu_focal root-volume=l:10G name=ams038 ip=none ipv6=true
# 开法国
scw instance server create type=STARDUST1-S zone=fr-par-1 image=ubuntu_focal root-volume=l:10G name=fr2 ip=none ipv6=true
# debian 11
scw instance server create type=STARDUST1-S zone=fr-par-1 image=debian_bullseye root-volume=l:10G name=fr038 ip=none ipv6=true
# fix firewall
# ssh - 一定要到有native ipv6的机器上
ssh root@2001:bc8:xxx:277::1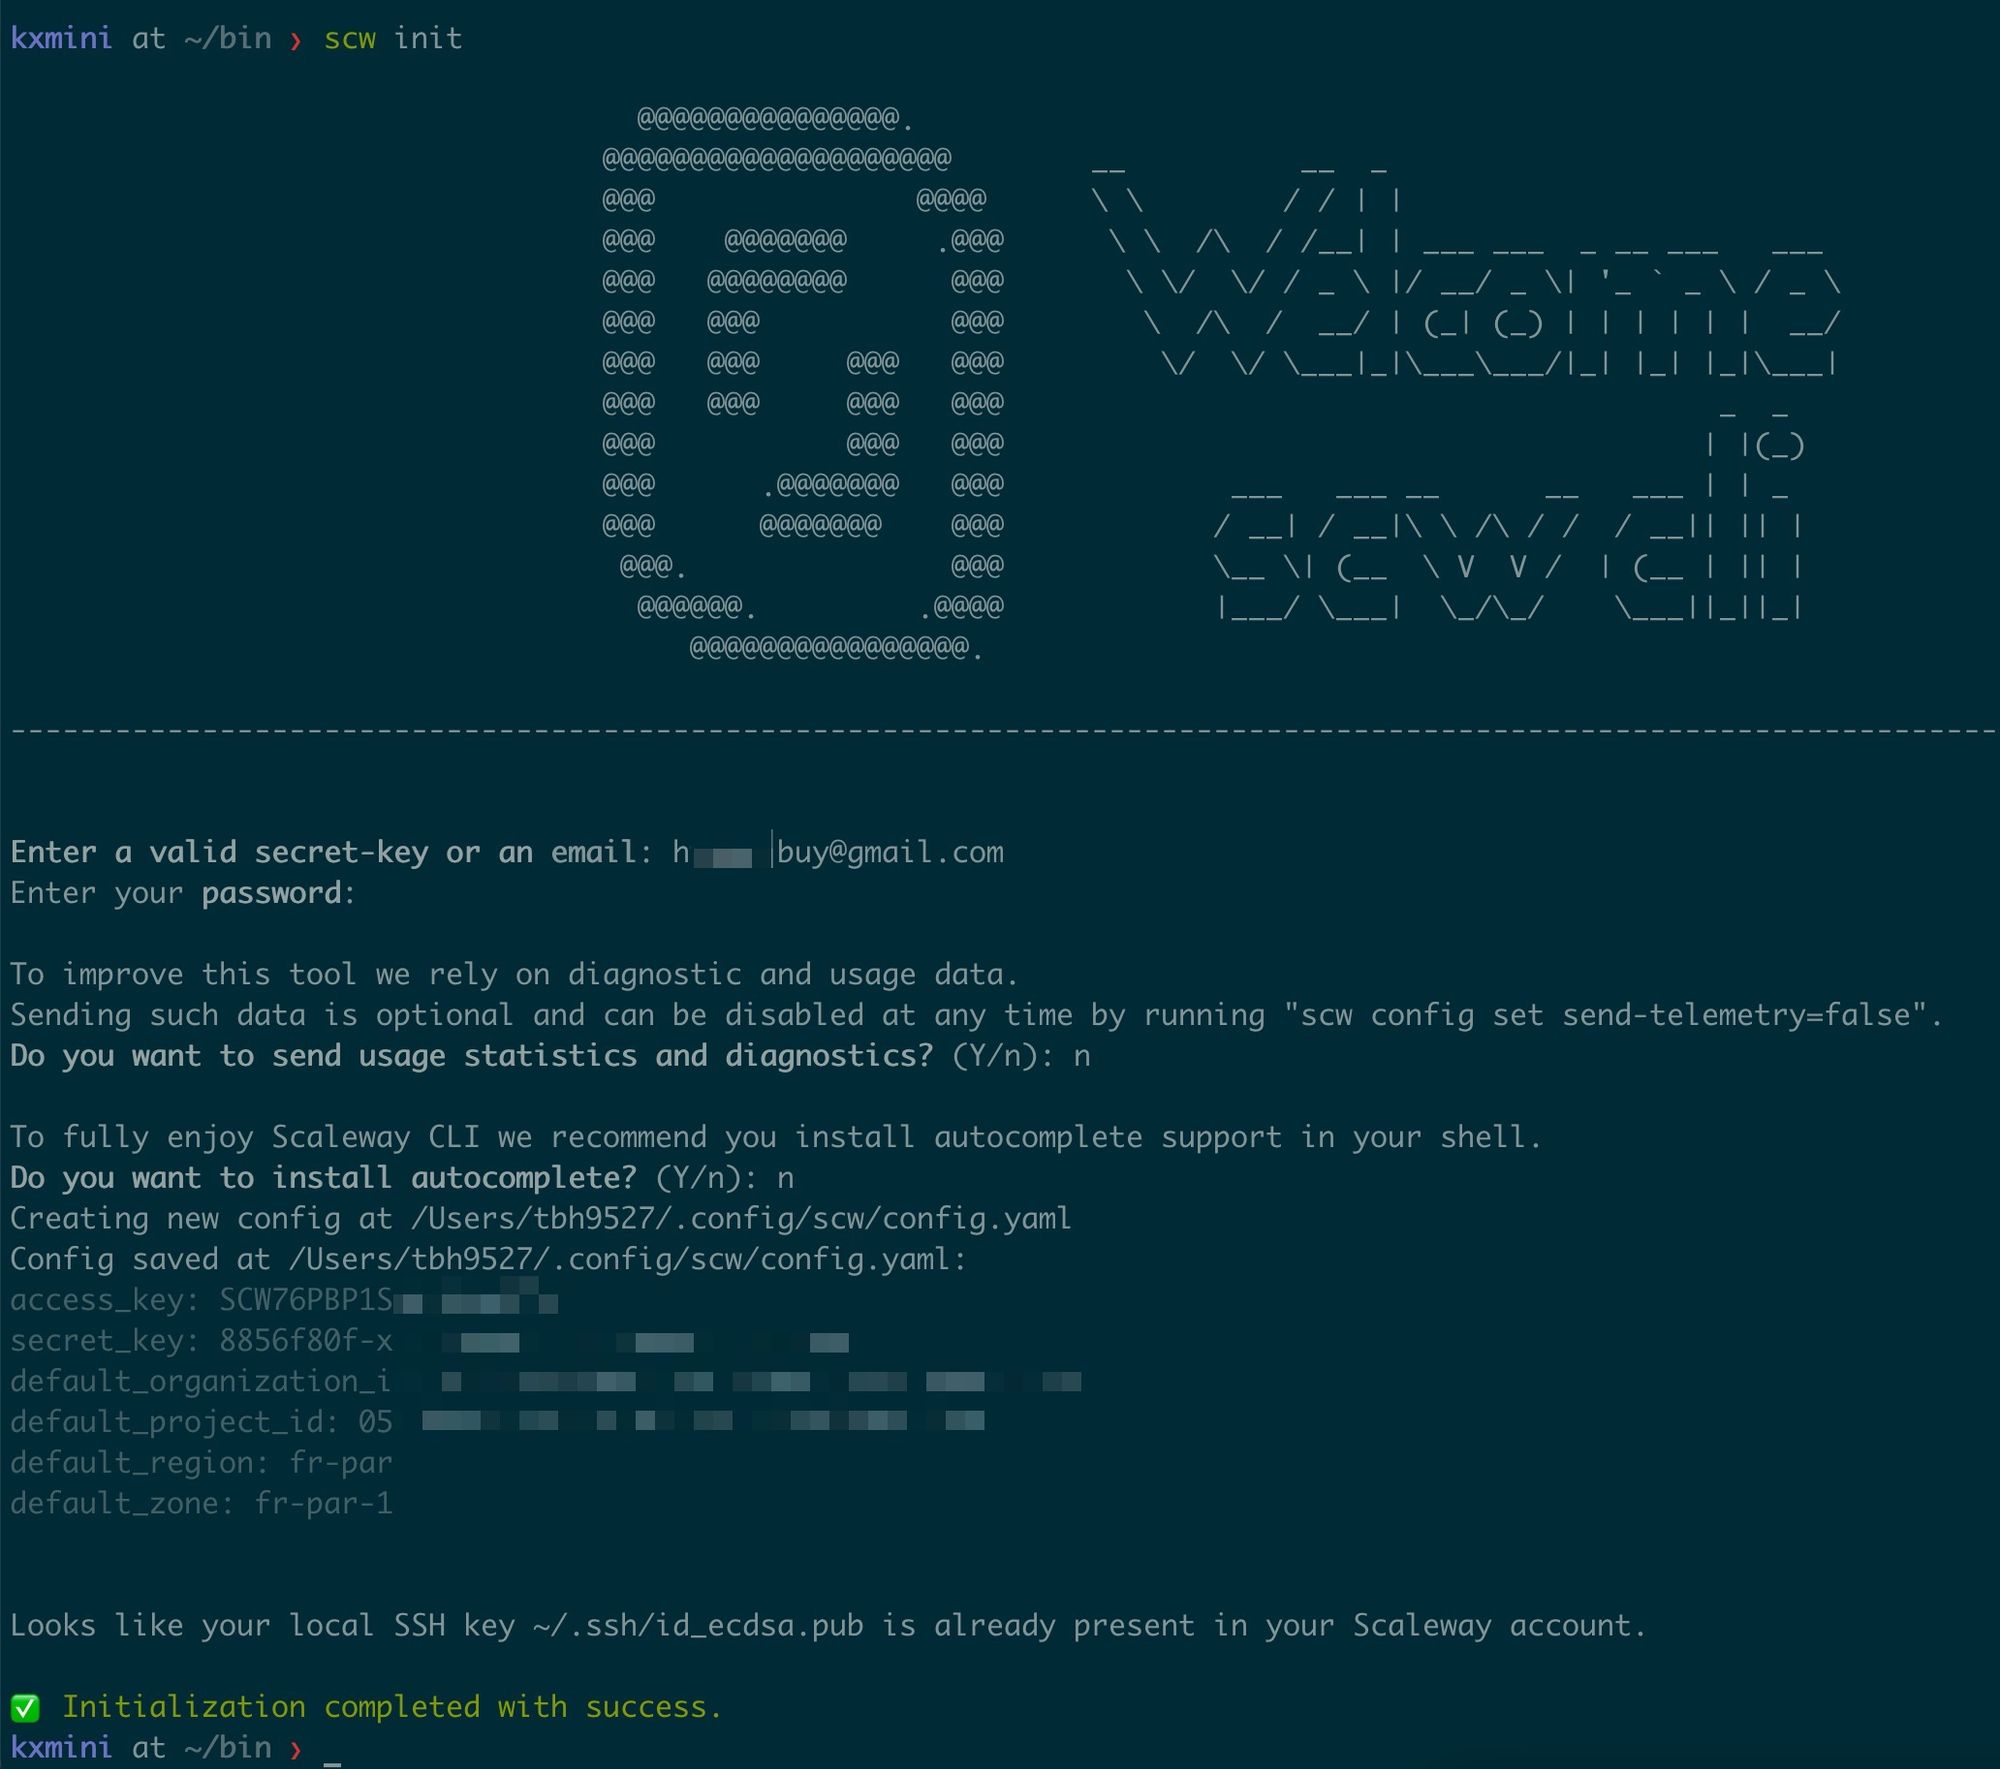
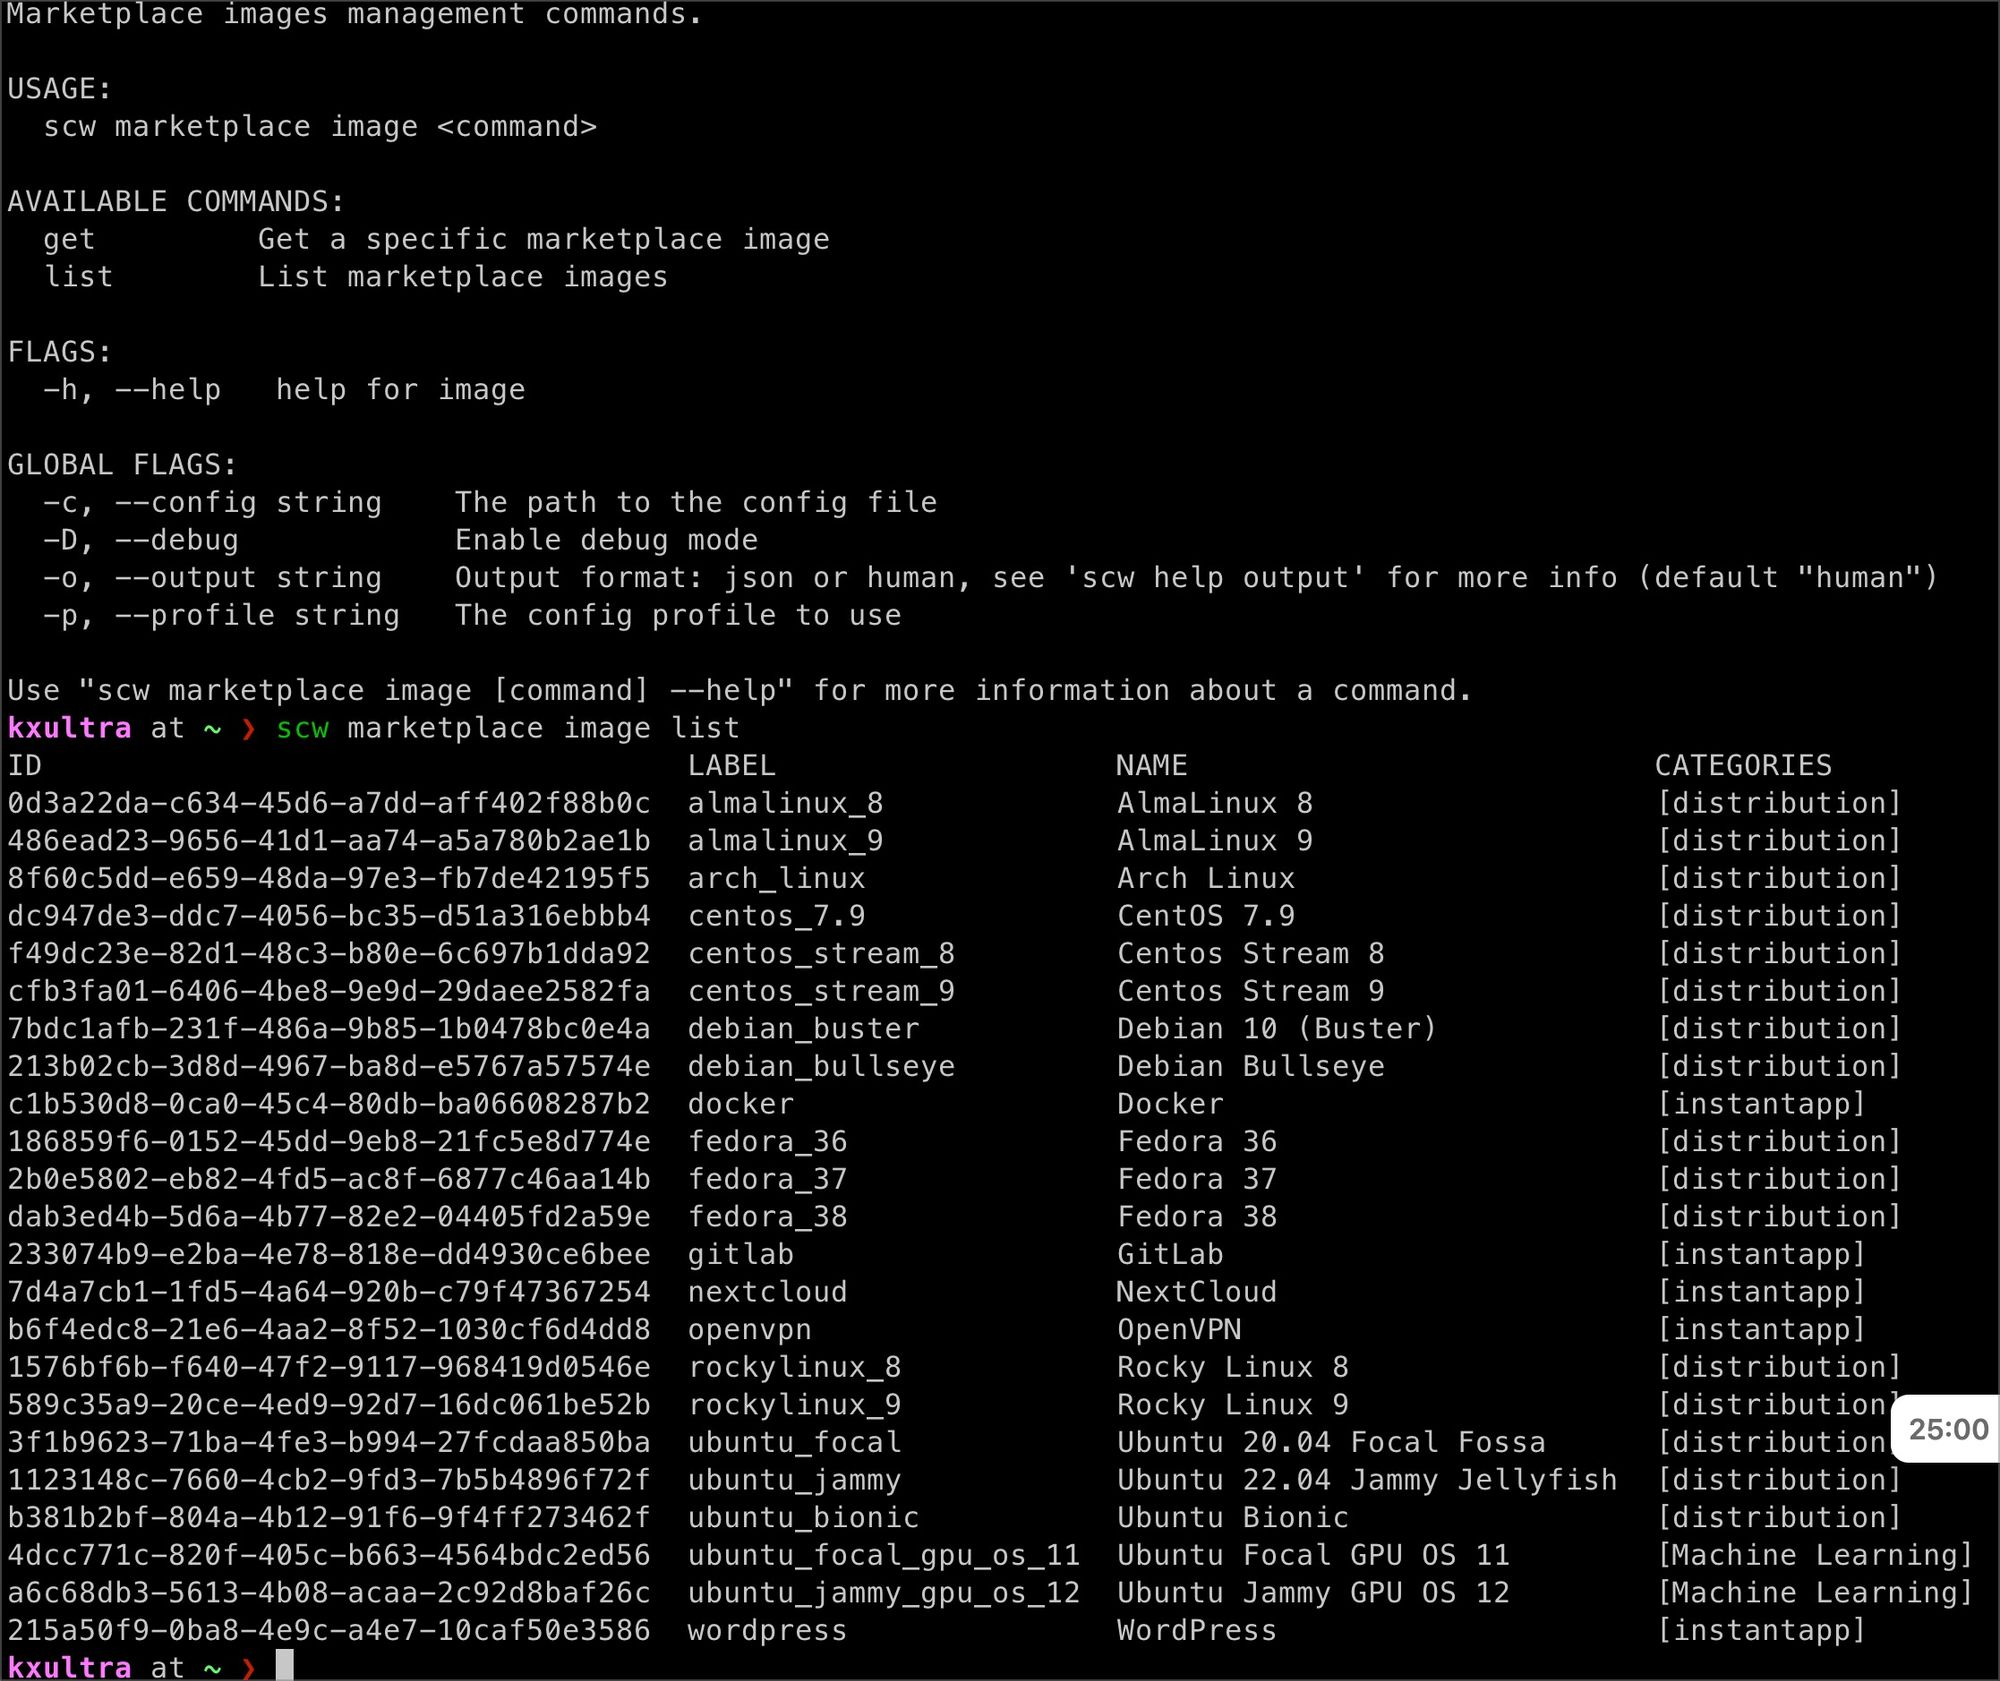
list image labels
CFWarp for IPv6 Only
# in ubuntu
# 不然git.io可能无法解析
root@ams038:~# cat /etc/resolv.conf
# Generated by resolvconf
nameserver 2001:4860:4860::8888
nameserver 2001:4860:4860::8844
nameserver 2001:67c:2b0::4
nameserver 2001:67c:2b0::6
nameserver 8.8.8.8
nameserver 8.8.4.4
# permanently 修改dns
apt install resolvconf
# systemctl status resolvconf.service
# base or head可能都可以
vi /etc/resolvconf/resolv.conf.d/base
# vi /etc/resolvconf/resolv.conf.d/head
nameserver 2001:4860:4860::8888
nameserver 2001:4860:4860::8844
nameserver 2001:67c:2b0::4
nameserver 2001:67c:2b0::6
nameserver 8.8.8.8
nameserver 8.8.4.4
sudo resolvconf -u
systemctl --now enable resolvconf.service
systemctl --now enable systemd-resolved.service
cat /etc/resolv.conf # to see changes permanently


# 如果是debian 看下面
vi /etc/systemd/resolved.conf
DNS=2001:4860:4860::8888 2001:4860:4860::8844 2001:67c:2b0::4 2001:67c:2b0::6 8.8.8.8 8.8.4.4


# 只开启ipv4就好
wget https://raw.githubusercontent.com/P3TERX/warp.sh/main/warp.sh && bash warp.sh menu


# 开机自动开启warp双栈
crontab -e
@reboot bash /root/warp.sh wgd

if in debian debian_bullseye
In Debian Bullseye (Debian 11), you can set the DNS server permanently by editing the configuration file for your network interfaces, typically found in `/etc/network/interfaces`, or using `systemd-resolved`. I'll provide steps for both methods:

#### Method 1: Editing the `/etc/network/interfaces` file

1. Open the `/etc/network/interfaces` file with your favorite text editor as root, for example:

```
sudo vim /etc/network/interfaces
```

2. Find the section corresponding to your network interface (e.g., `eth0` for the first Ethernet interface or `wlan0` for the first wireless interface).

3. Add the following line in that section to set the permanent DNS server for that interface:

```
dns-nameservers x.x.x.x y.y.y.y
```

Replace `x.x.x.x` and `y.y.y.y` with the IP addresses of the desired DNS servers.

4. Save the changes and close the text editor.

5. Run the following command to restart the networking service:

```
sudo systemctl restart networking
```

#### Method 2: Using `systemd-resolved` for the DNS

1. Open the `/etc/systemd/resolved.conf` file with your favorite text editor as root, for example:

```
sudo nano /etc/systemd/resolved.conf
```

2. Find the line that says `#DNS=`, and uncomment it by removing the `#` symbol.

3. Add the DNS server addresses after the equal sign, separated by spaces, like this:

```
DNS=x.x.x.x y.y.y.y
```

Replace `x.x.x.x` and `y.y.y.y` with the IP addresses of your desired DNS servers.

4. Save the changes and close the text editor.

5. Restart the `systemd-resolved` service to apply the changes:

```
sudo systemctl restart systemd-resolved
```

Now your DNS servers should be set permanently in Debian Bullseye.

For additional information, check these resources:

- Debian Wiki - Network Configuration: https://wiki.debian.org/NetworkConfiguration
- Debian Wiki - Systemd-resolved: https://wiki.debian.org/systemd-resolved
CloudFlare - 设立AAAA,并打开Proxy(小云朵)
各种测试
机器配置 + 测速
----------------------------------------------------------------------
# 国内机器最多
wget -qO- git.io/superbench.sh | bash
----------------------------------------------------------------------
## bench.sh是秋水逸冰写的一个VPS测试脚本,全面适用于各种 Linux 发行版的网络(下行)和 IO 测试 - 4个都一样
wget -qO- bench.sh | bash
curl -Lso- bench.sh | bash
wget -qO- 86.re/bench.sh | bash
curl -so- 86.re/bench.sh | bash
----------------------------------------------------------------------
curl -fsSL https://ilemonra.in/LemonBenchIntl | bash -s fast
wget -qO- https://ilemonra.in/LemonBenchIntl | bash -s fast
curl -fsSL https://ilemonra.in/LemonBenchIntl | bash -s full
wget -qO- https://ilemonra.in/LemonBenchIntl | bash -s full
----------------------------------------------------------------------
yabs - cpu测试
curl -sL yabs.sh | bash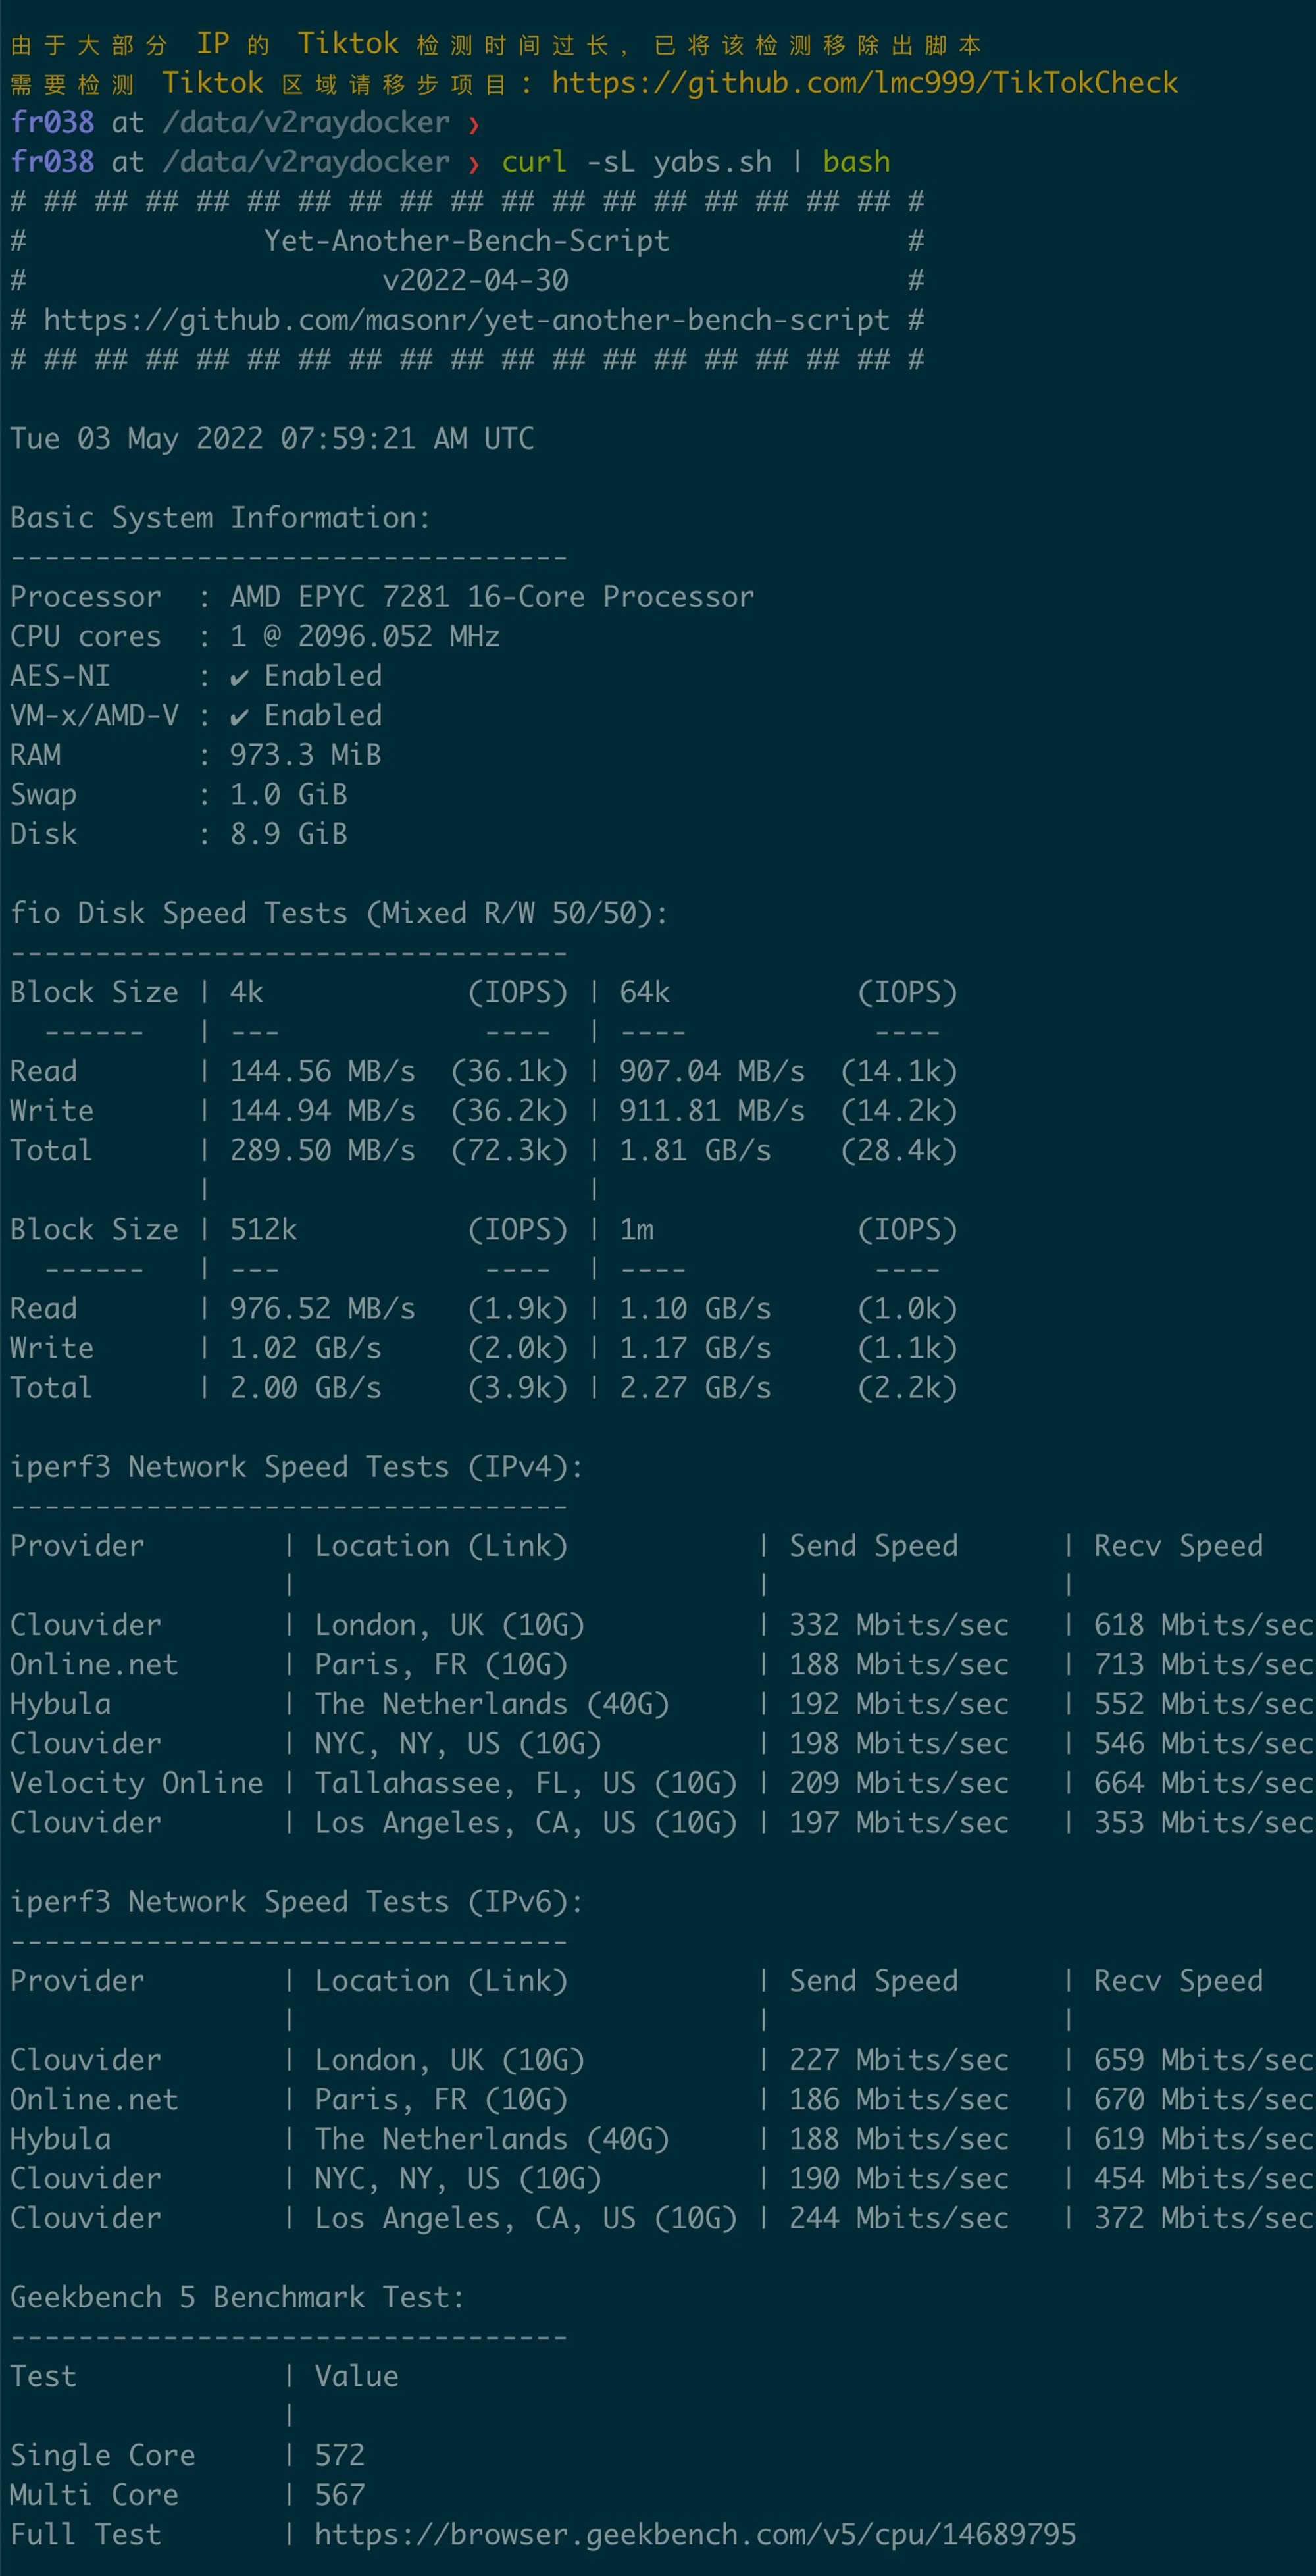
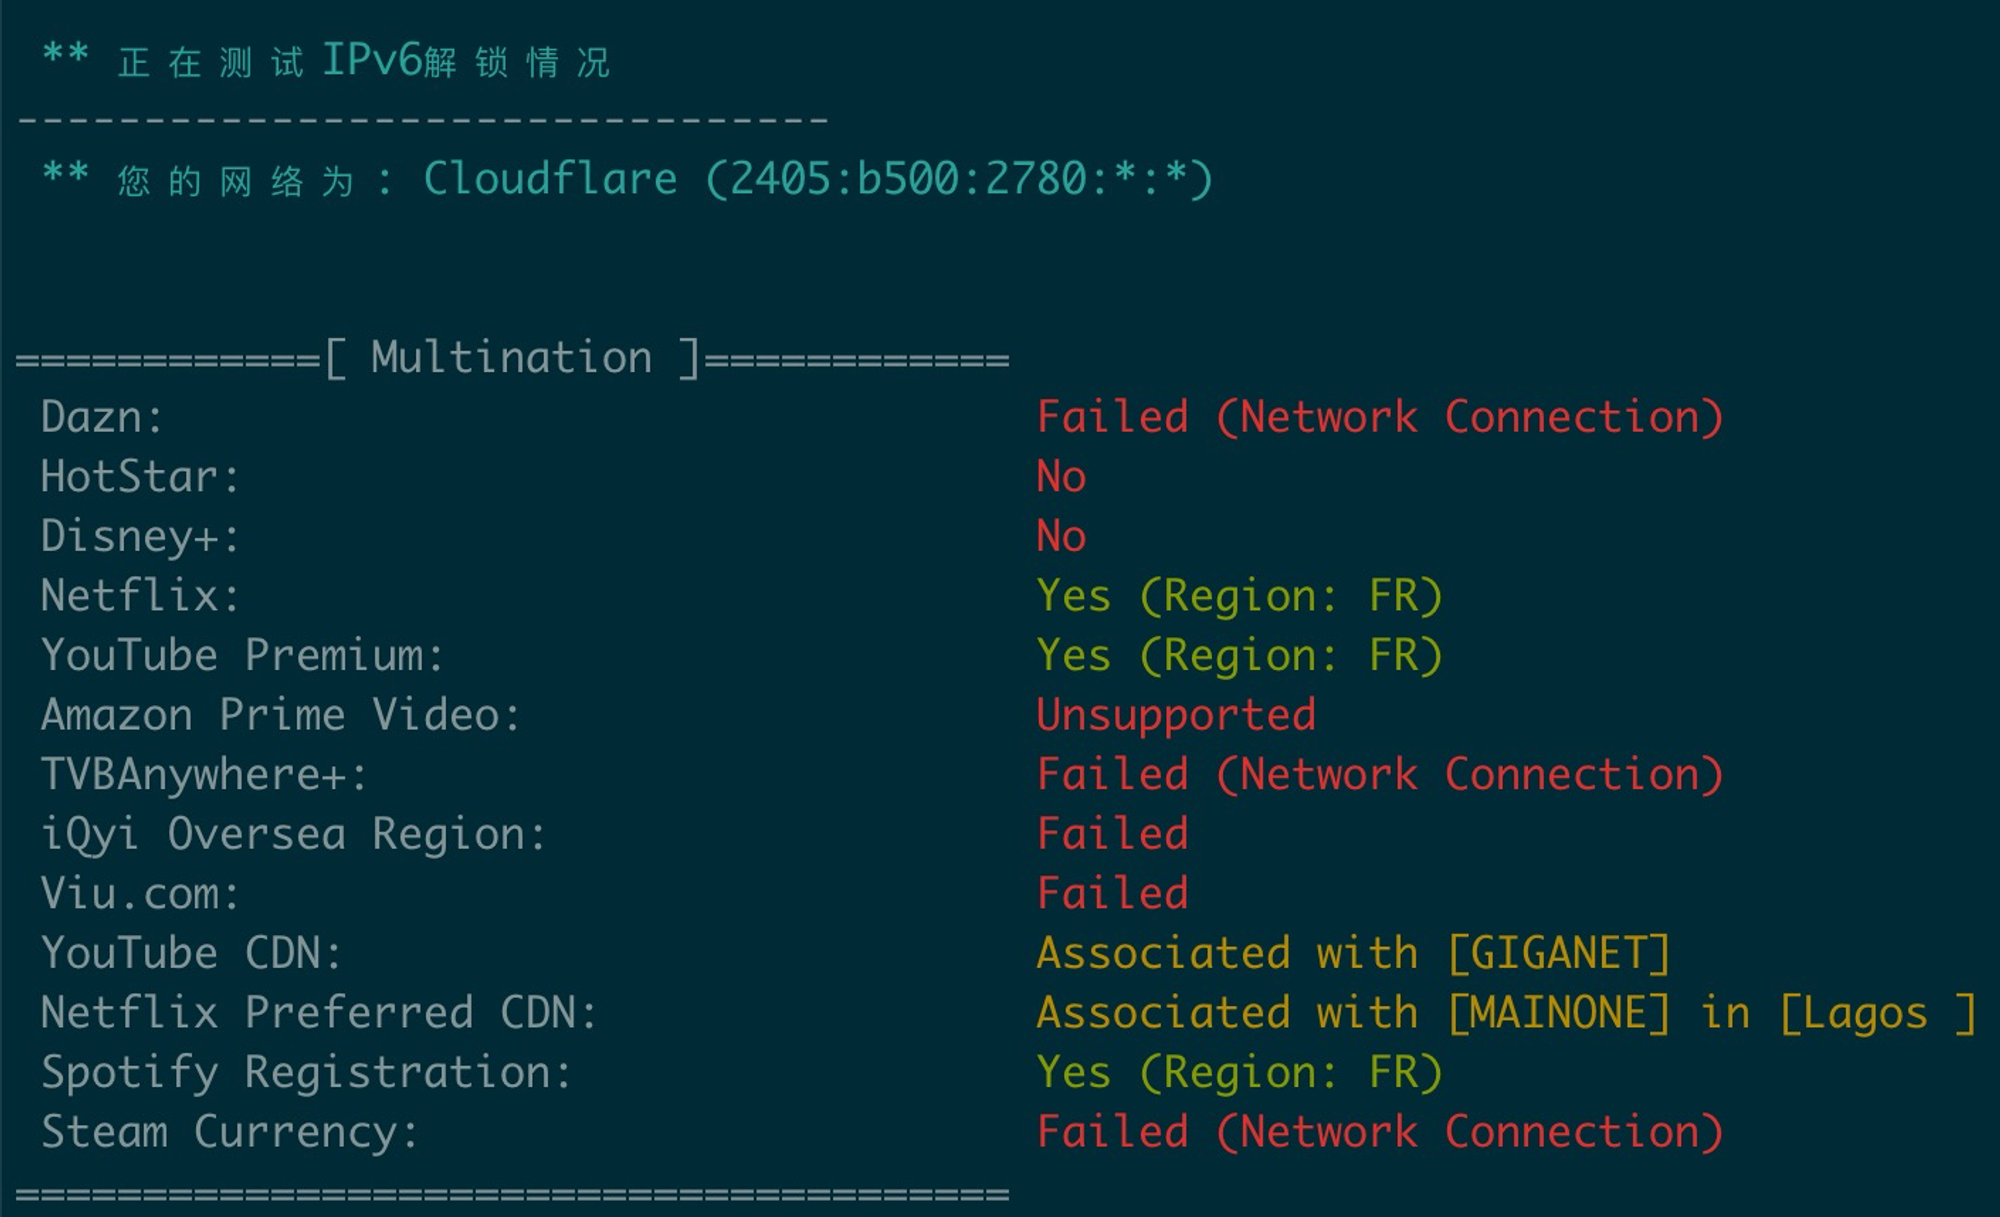
流媒体
wget -O nf https://github.com/sjlleo/netflix-verify/releases/download/2.01/nf_2.01_linux_amd64 && chmod +x nf && clear && ./nf
# ==
wget -O nf https://file.10244201.xyz/pub/netflix_check_1 && chmod +x nf && clear && ./nf

### 或者最全面的测试
docker run --rm --net=host lmc999/regioncheck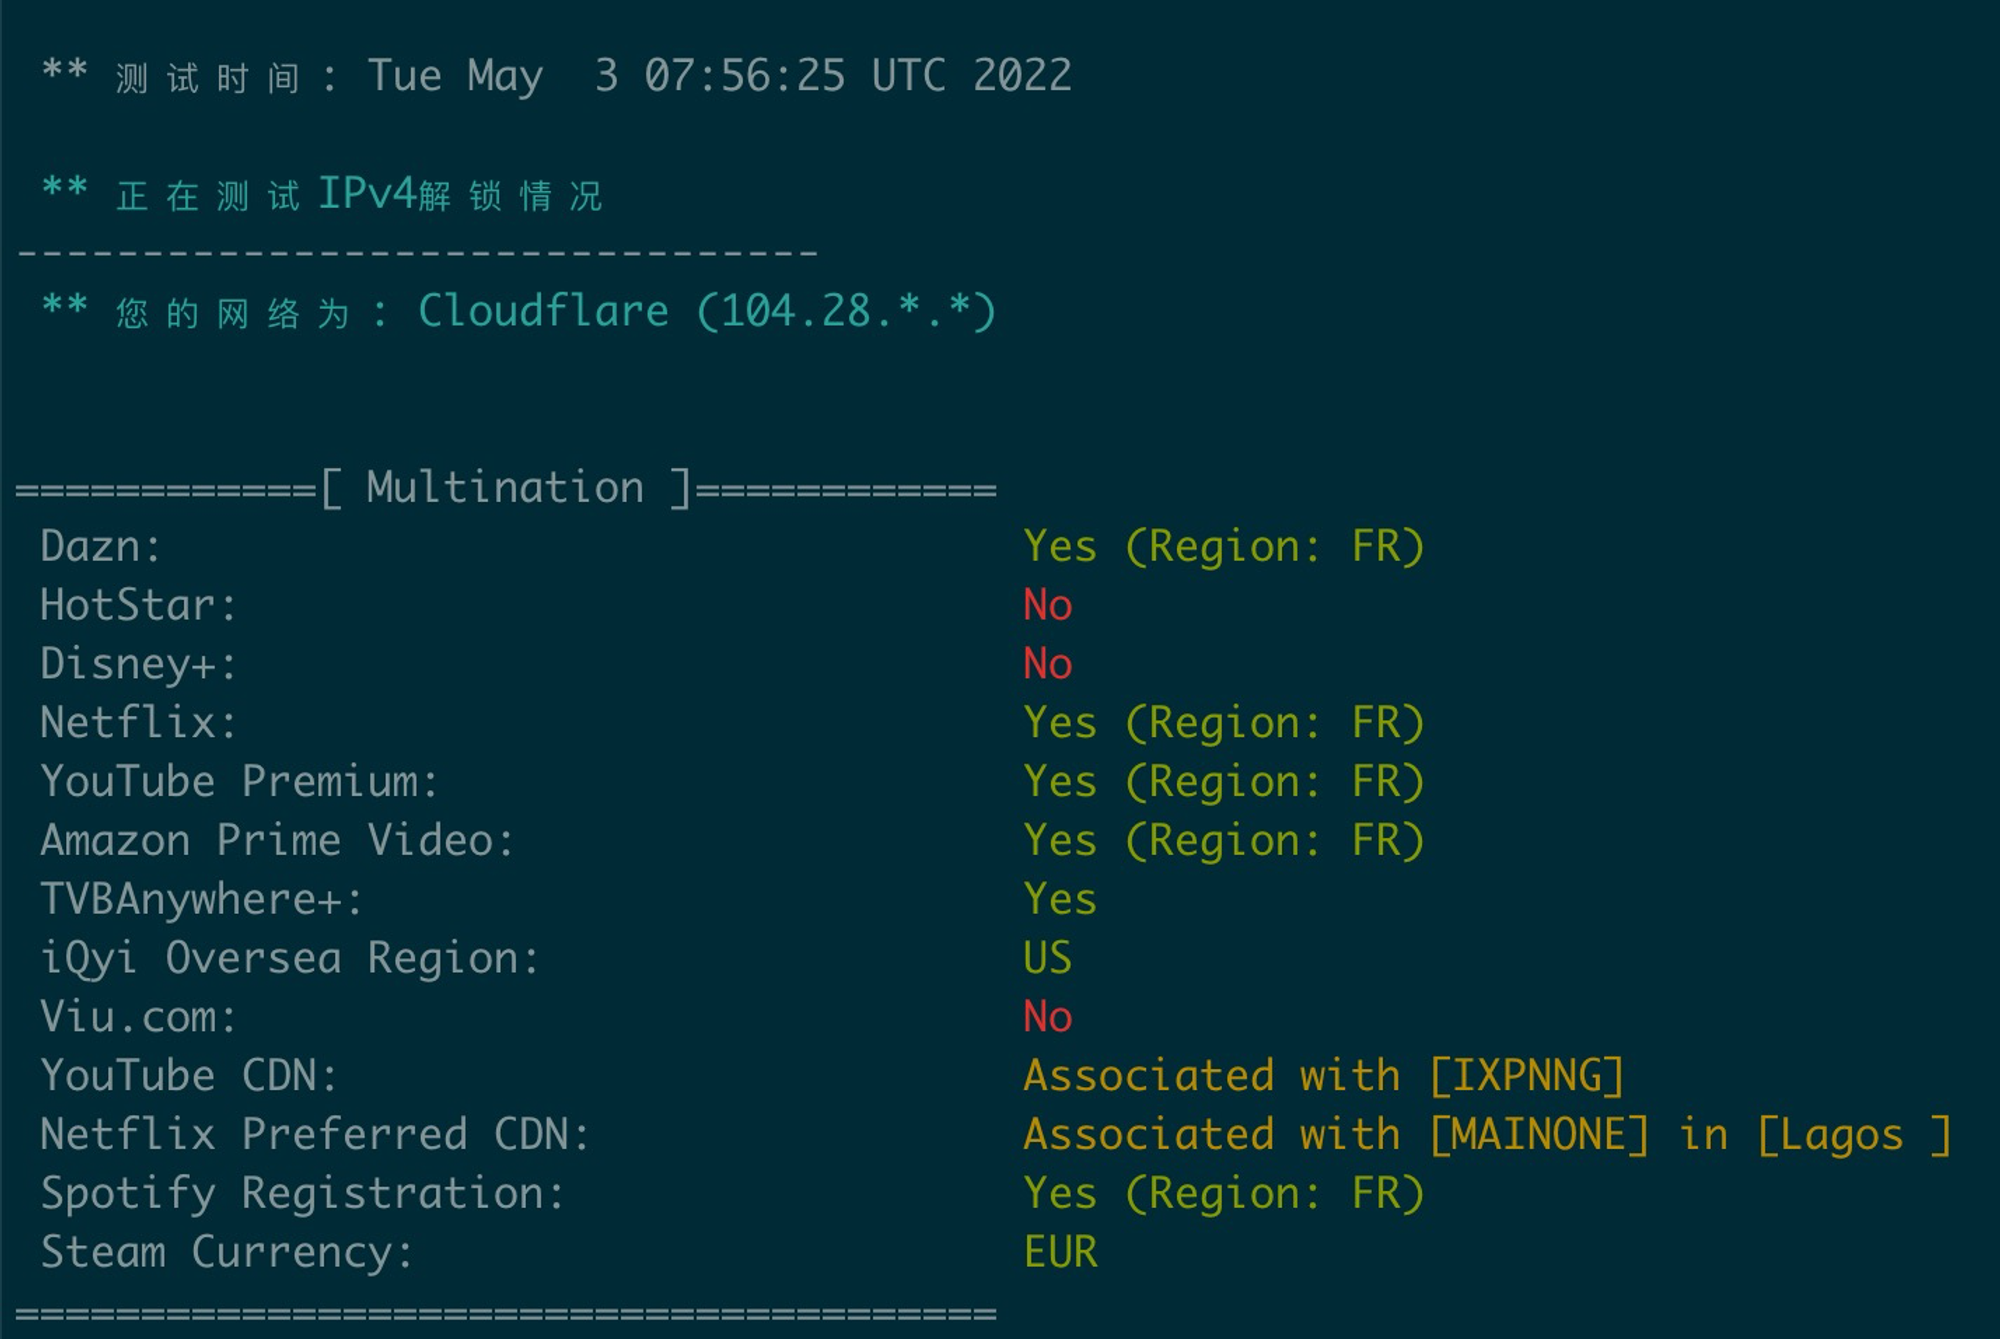
回程
wget -qO- git.io/besttrace | bash
curl http://tutu.ovh/bash/returnroute/test.sh | bash
可选
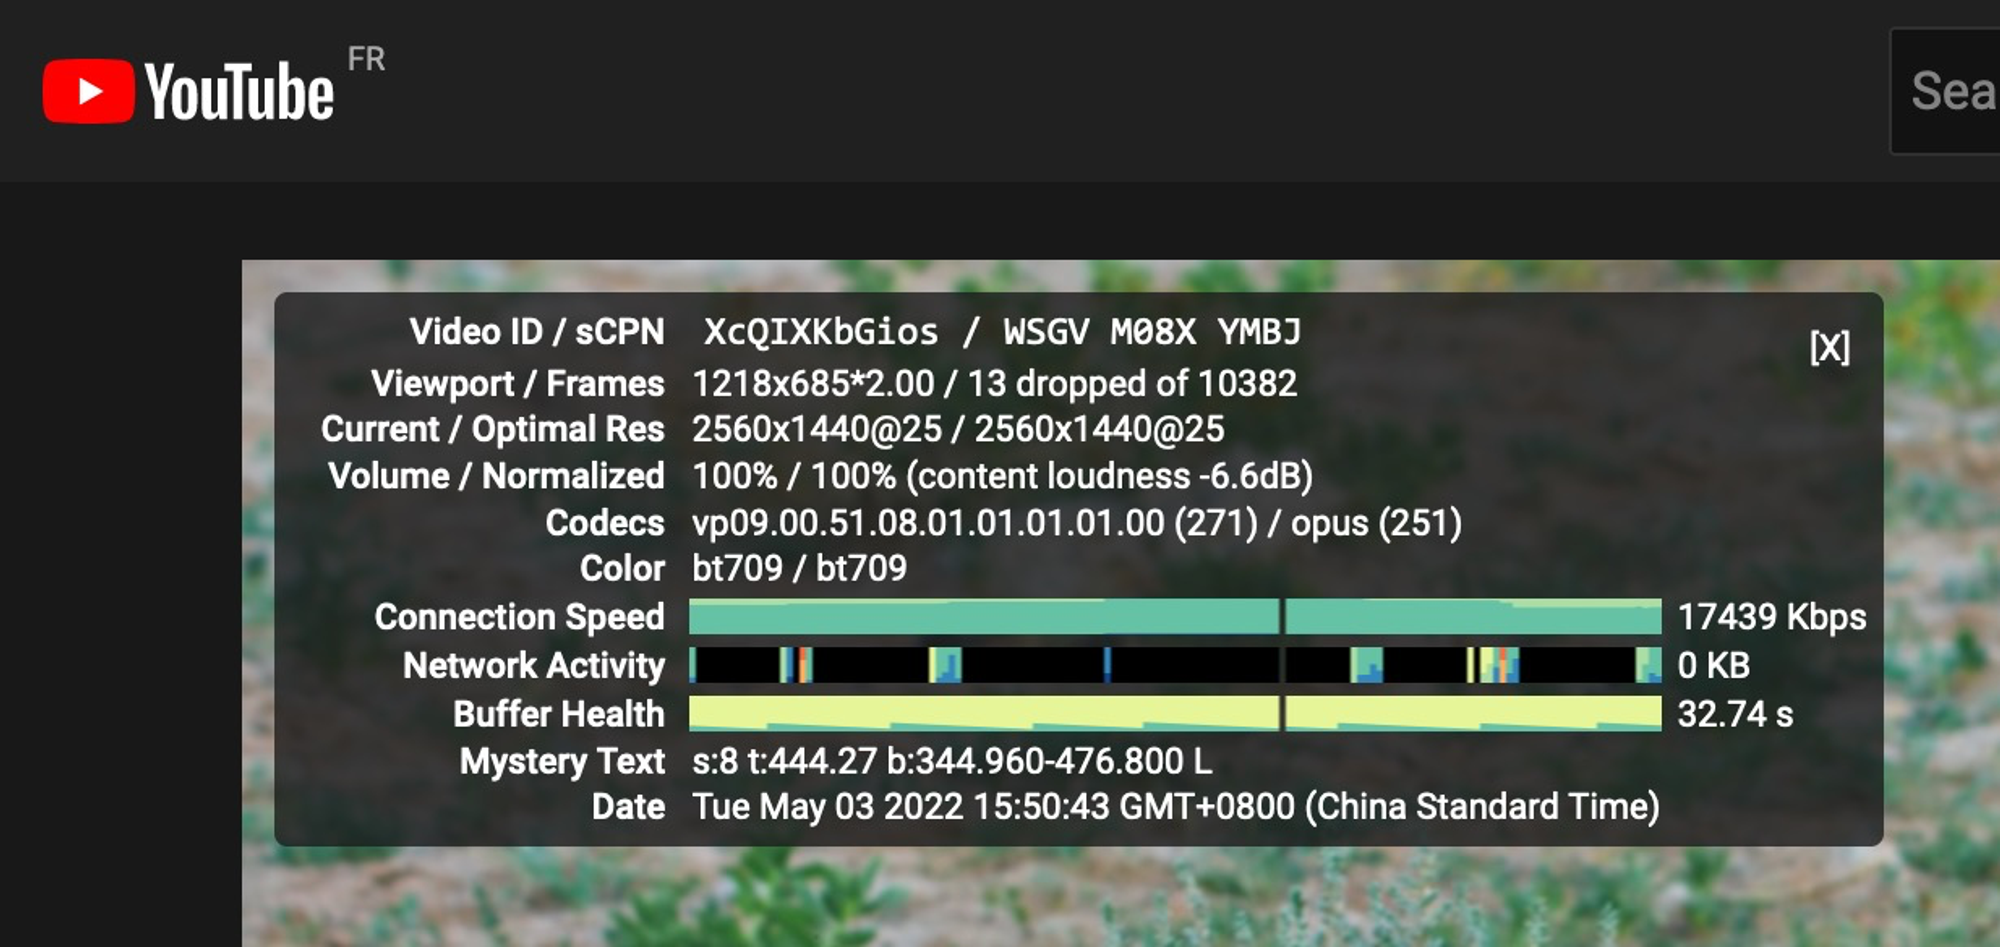
Youtube
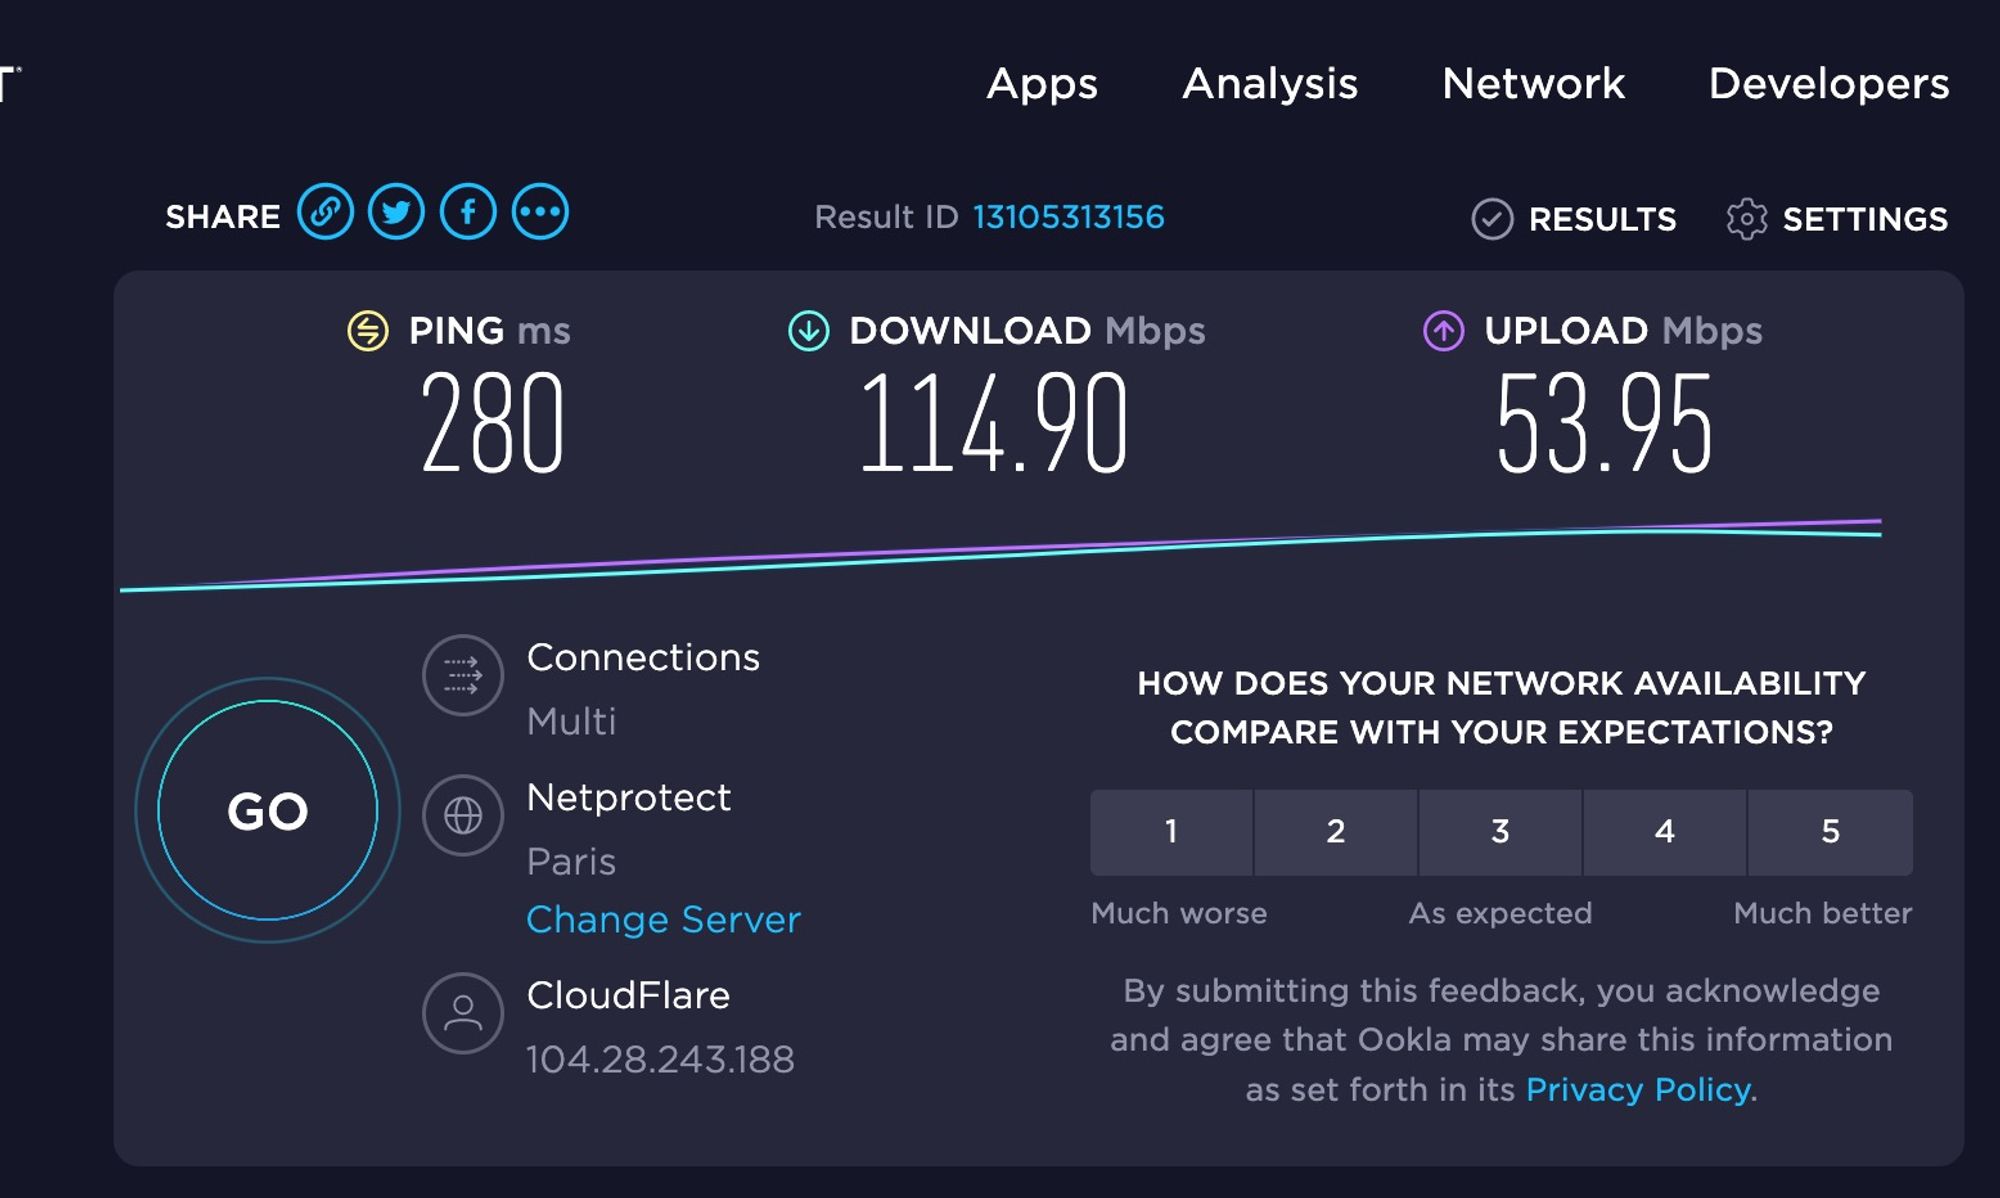
Speedtest测速
## html5 speedtest - 带测速历史
curl -sSL https://get.docker.com/ | sh
docker run -d -p 9001:80 --name speedtestx -e SAME_IP_MULTI_LOGS=true --restart=always badapple9/speedtest-x
## html5 speedtest - 不带测速历史
apt install -y docker.io && docker run -d -p 9080:80 --name speedtest --restart=always ilemonrain/html5-speedtest:alpine
下午4点

夜里3点
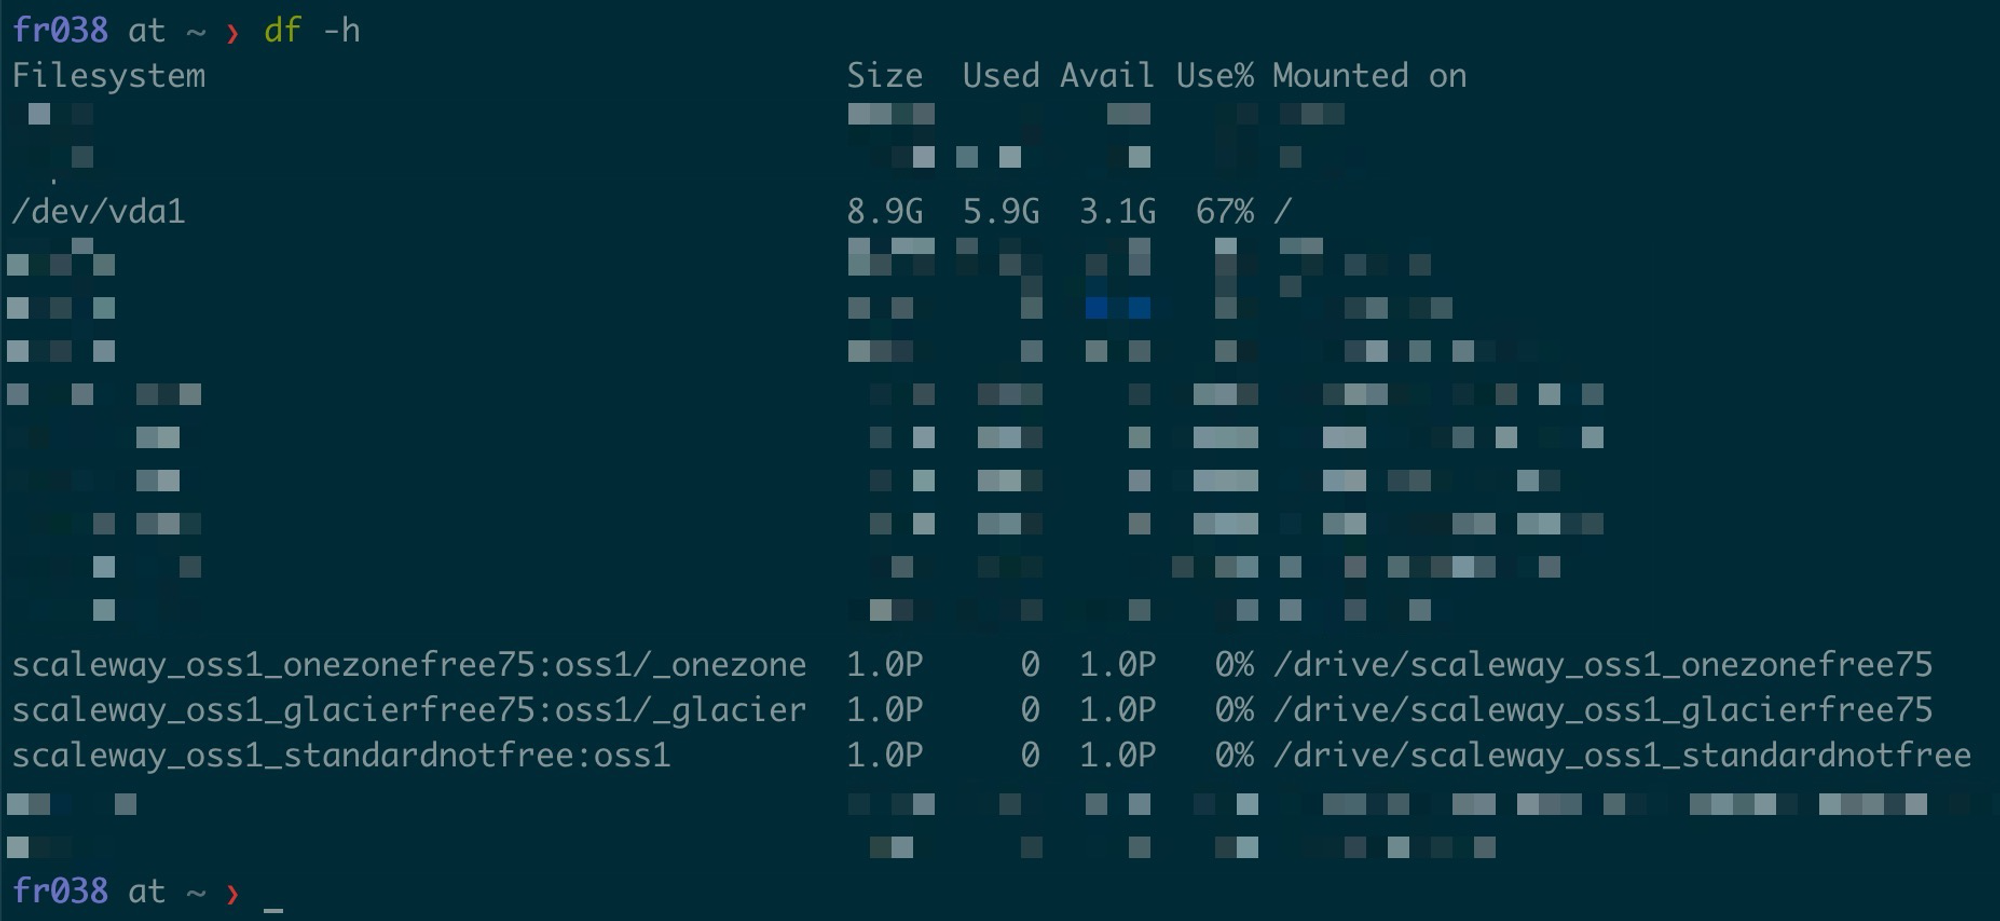
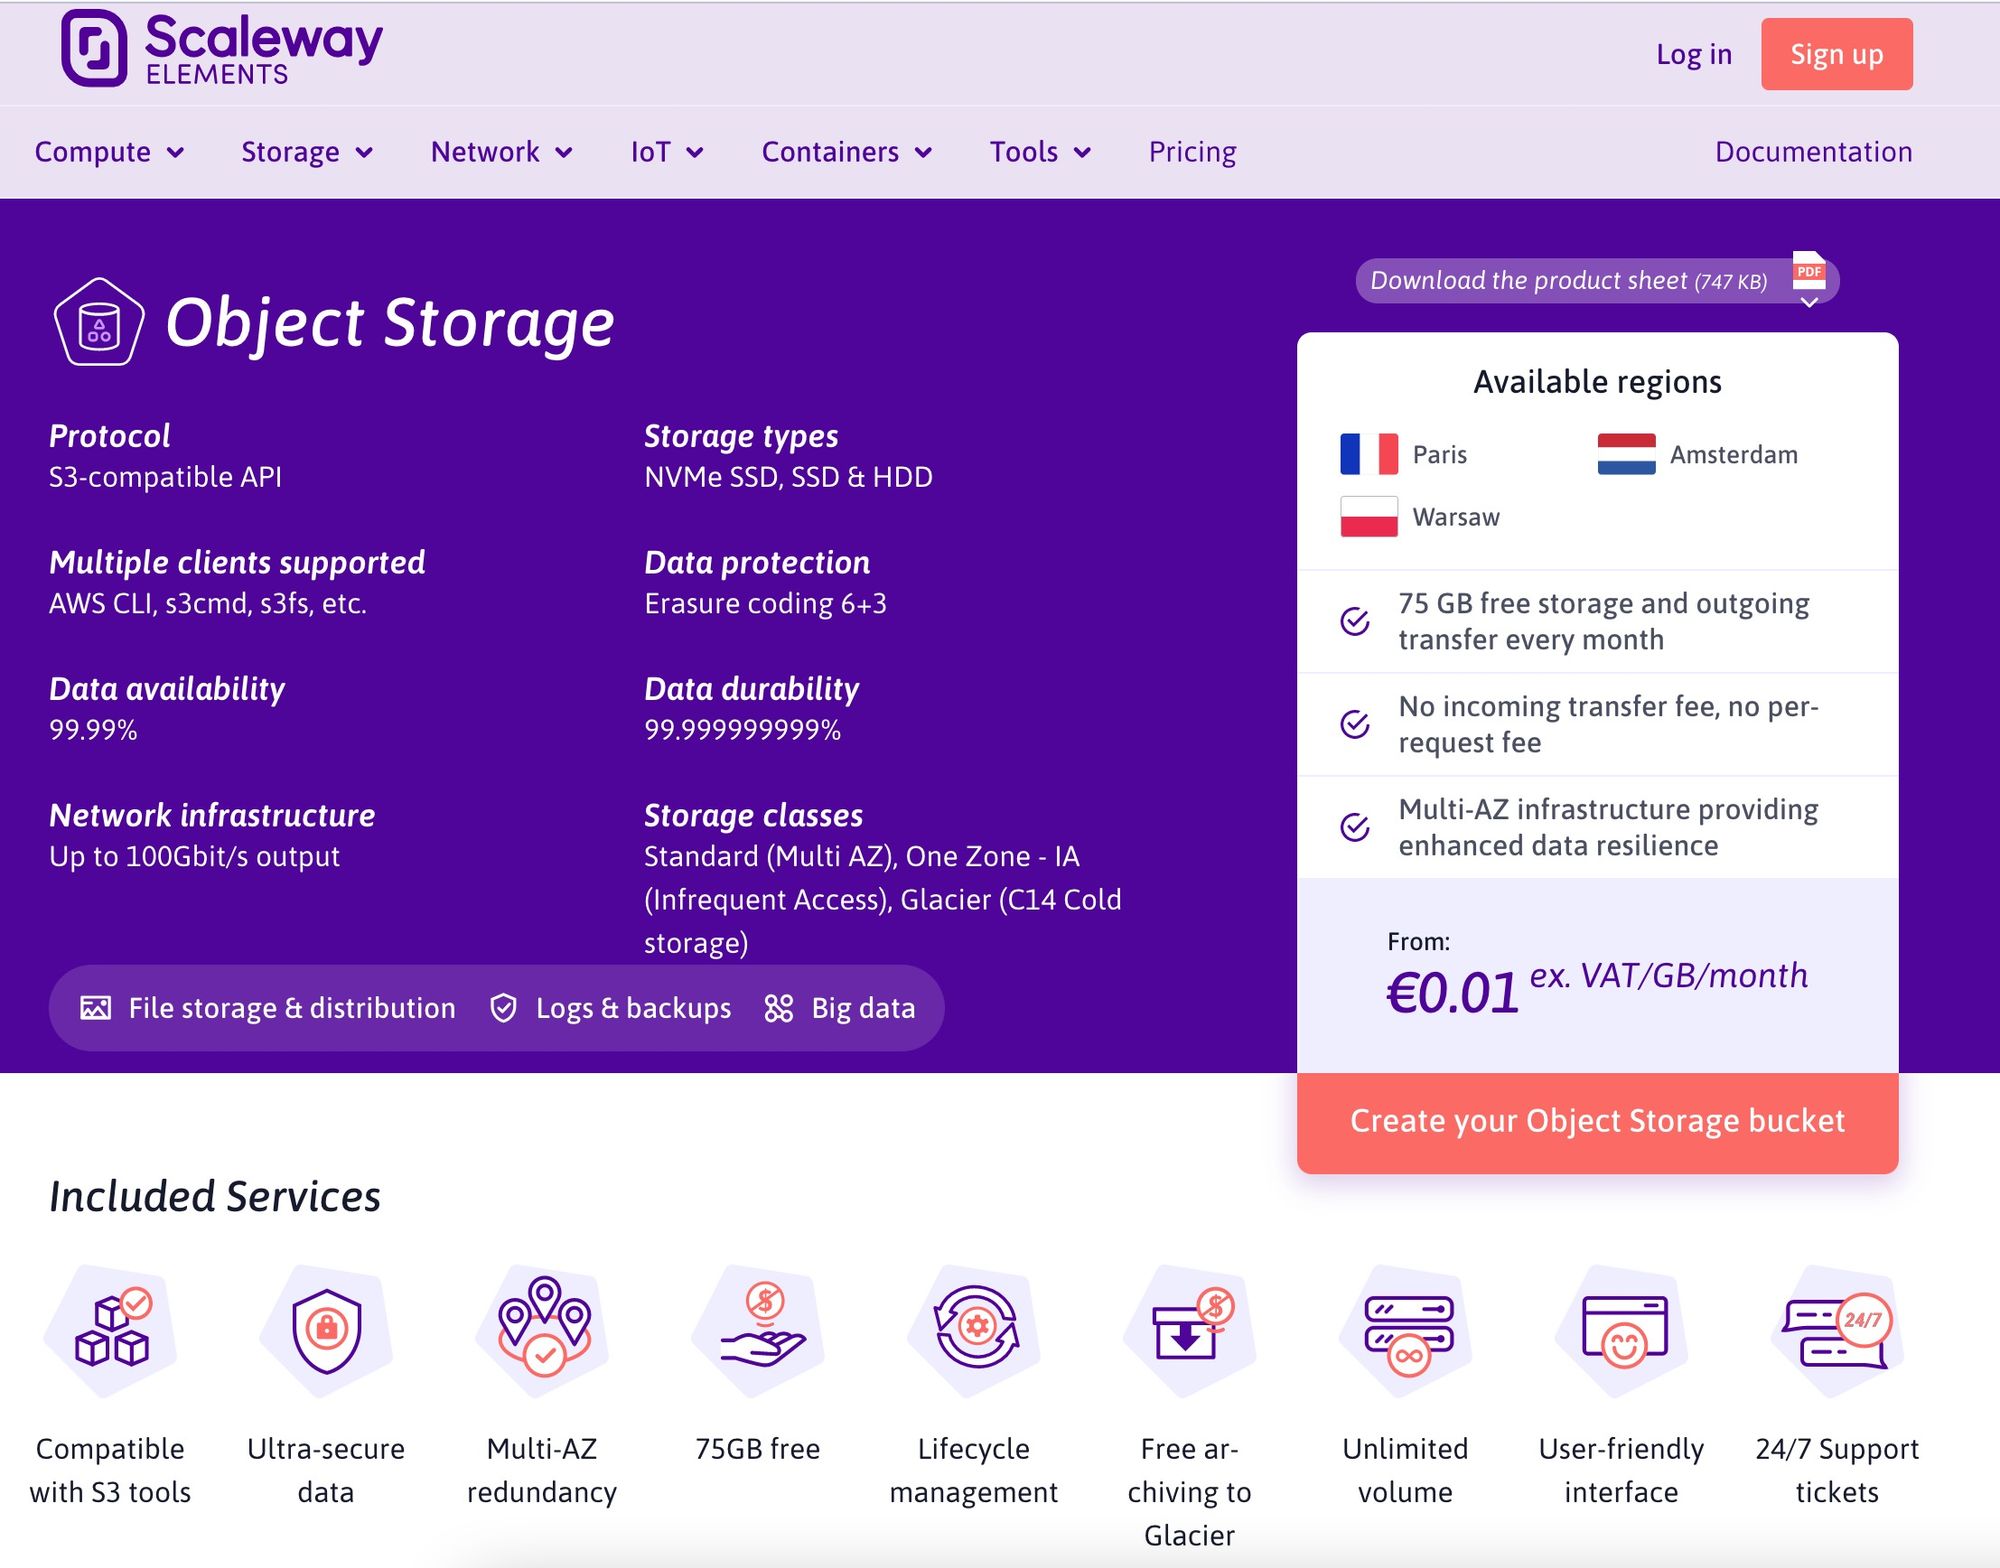
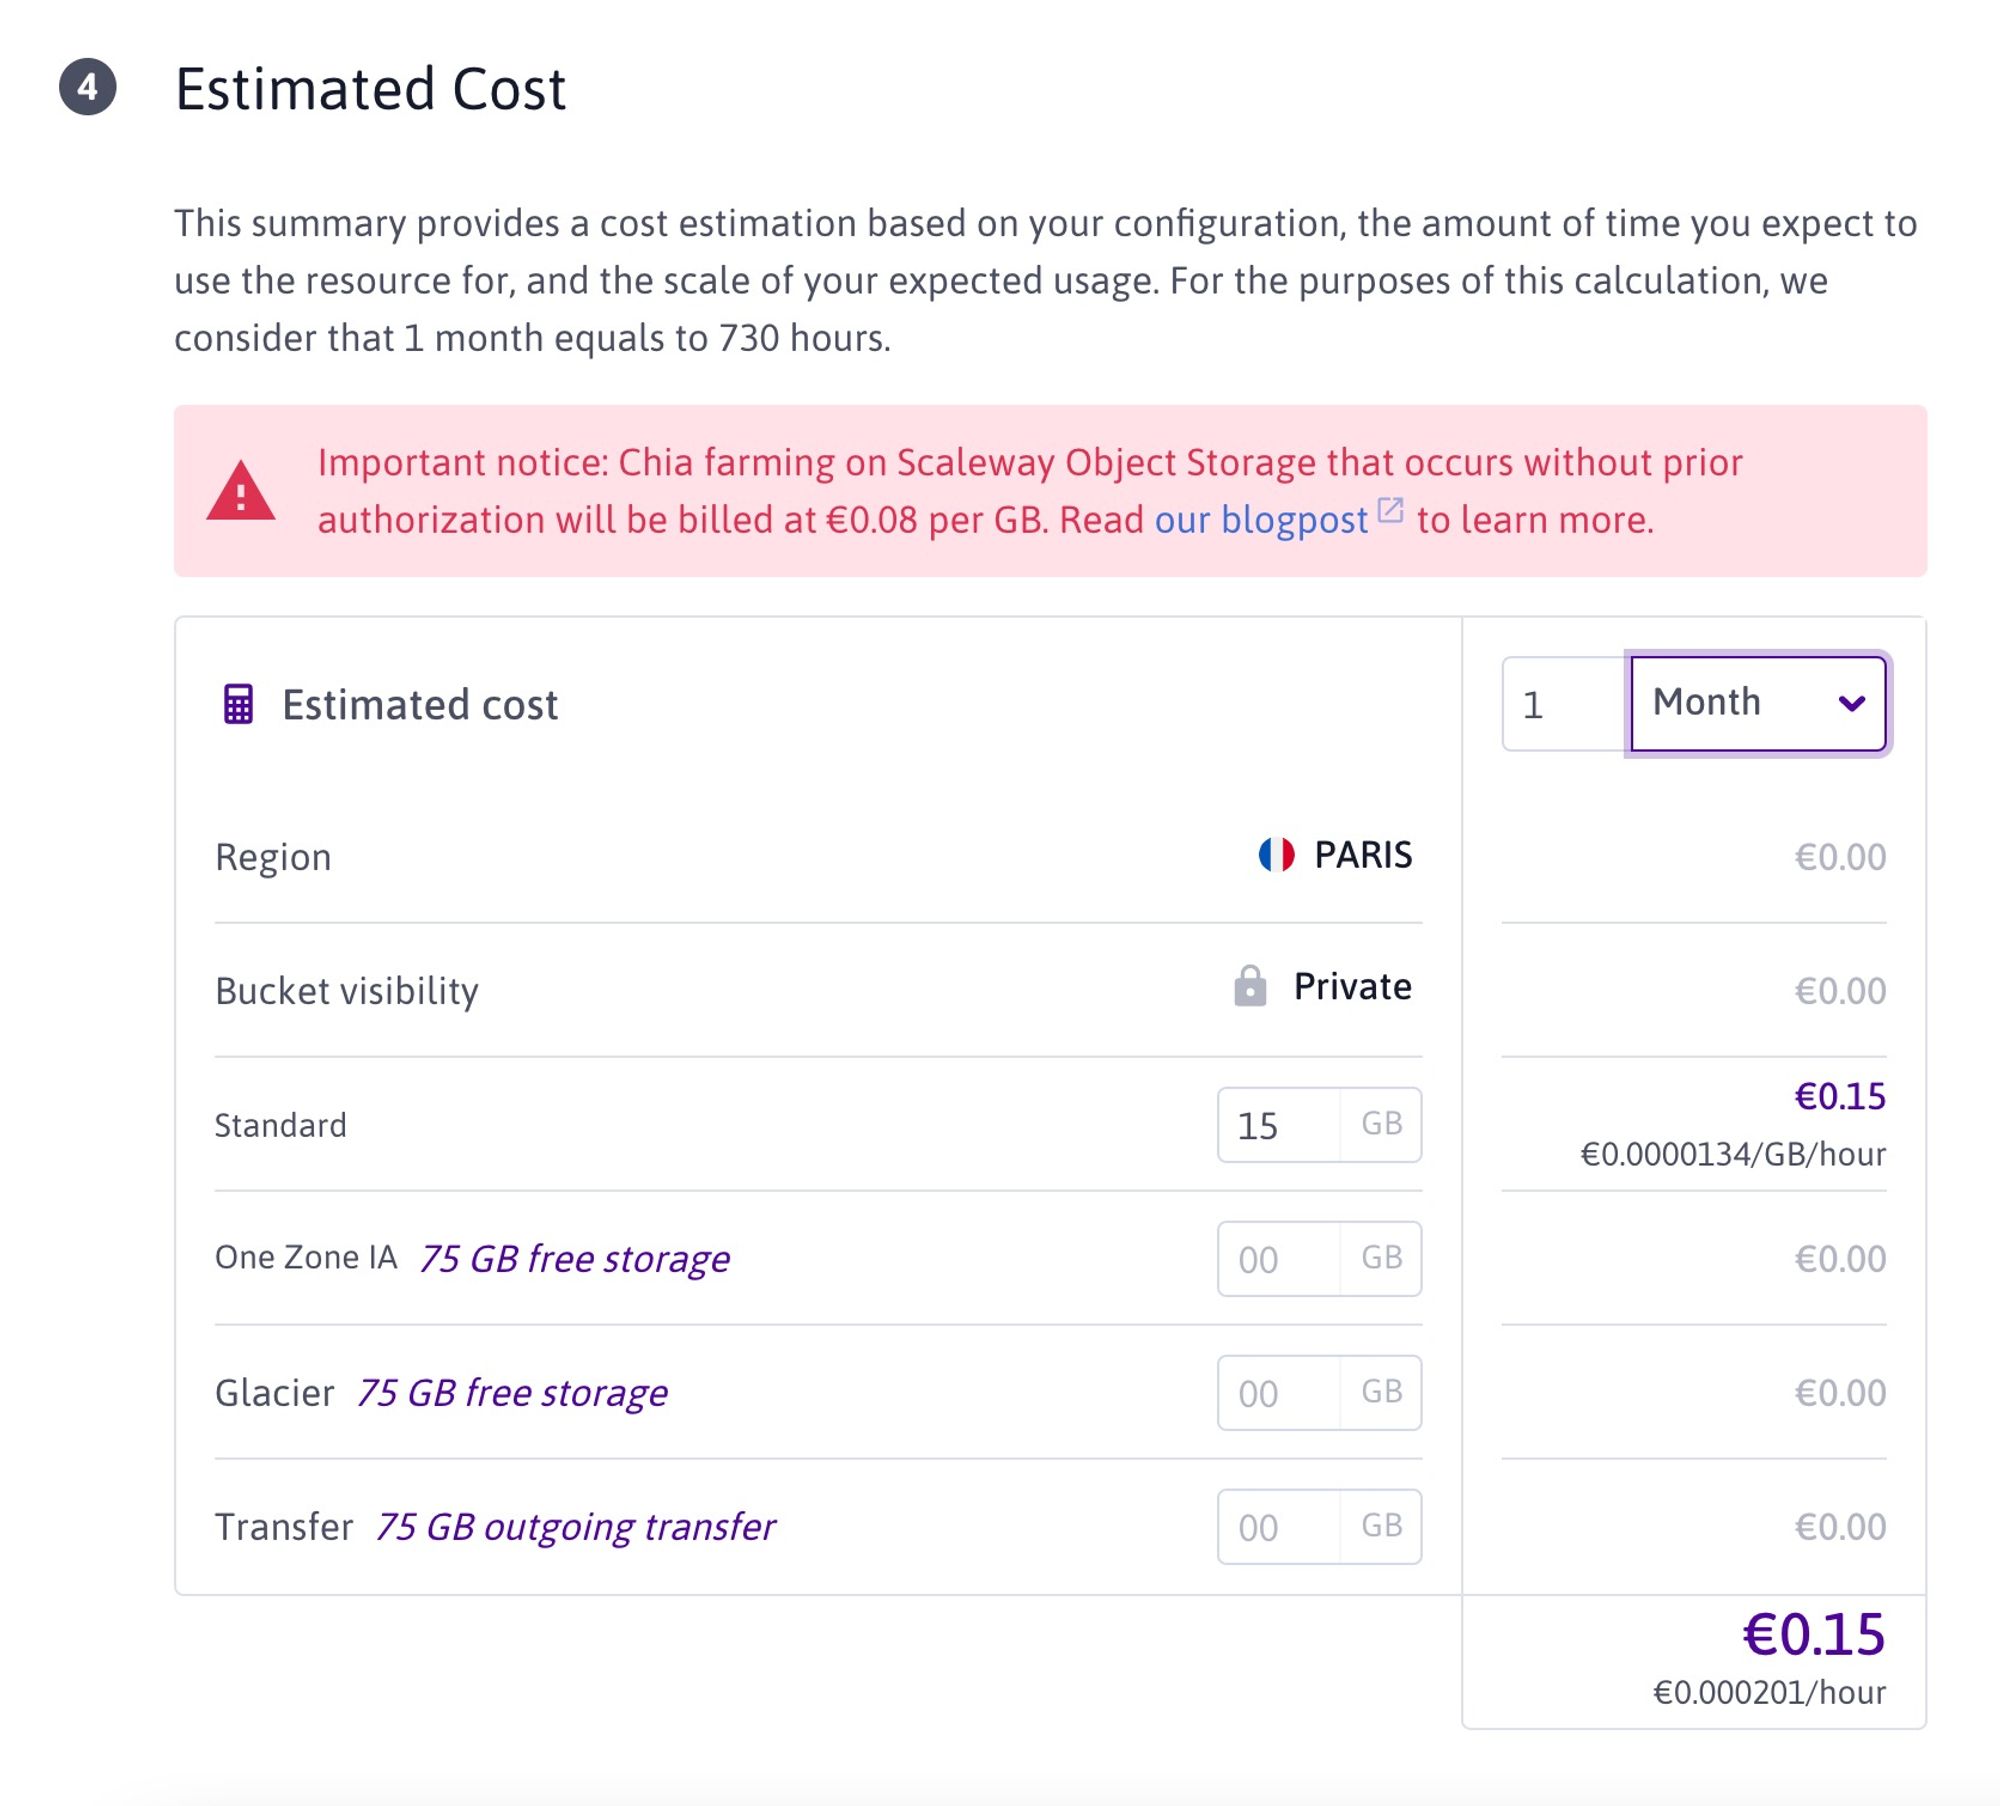
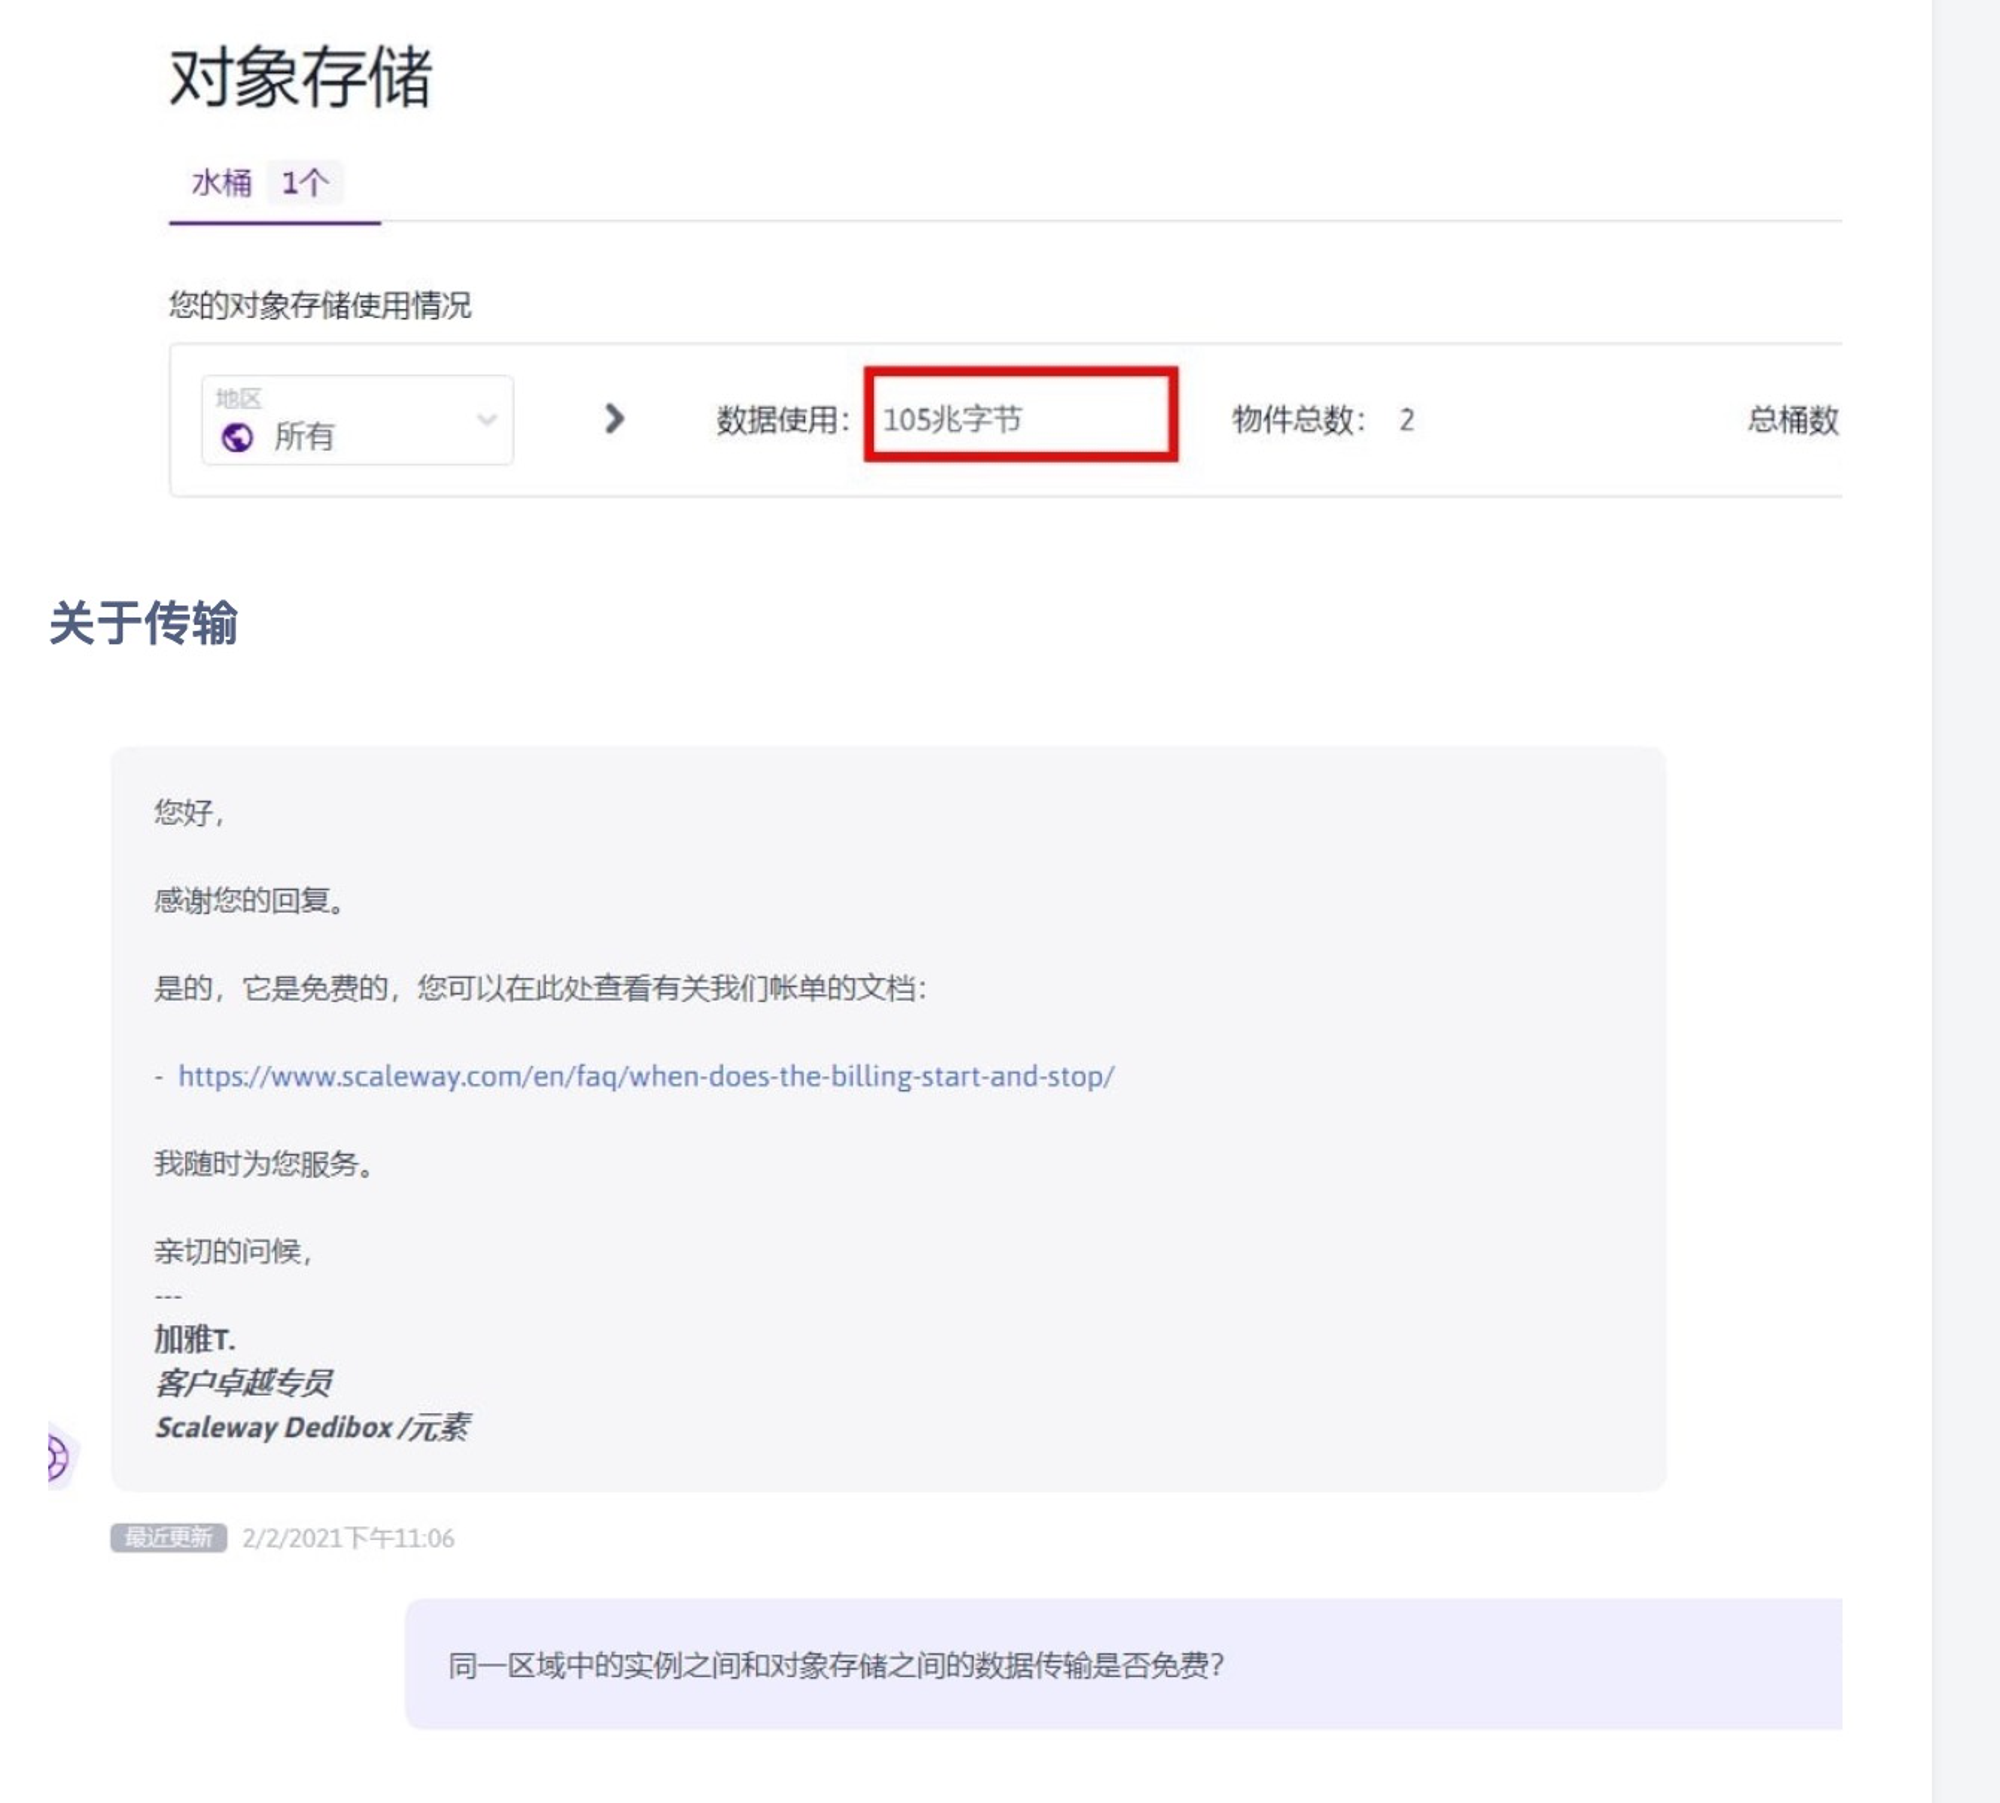
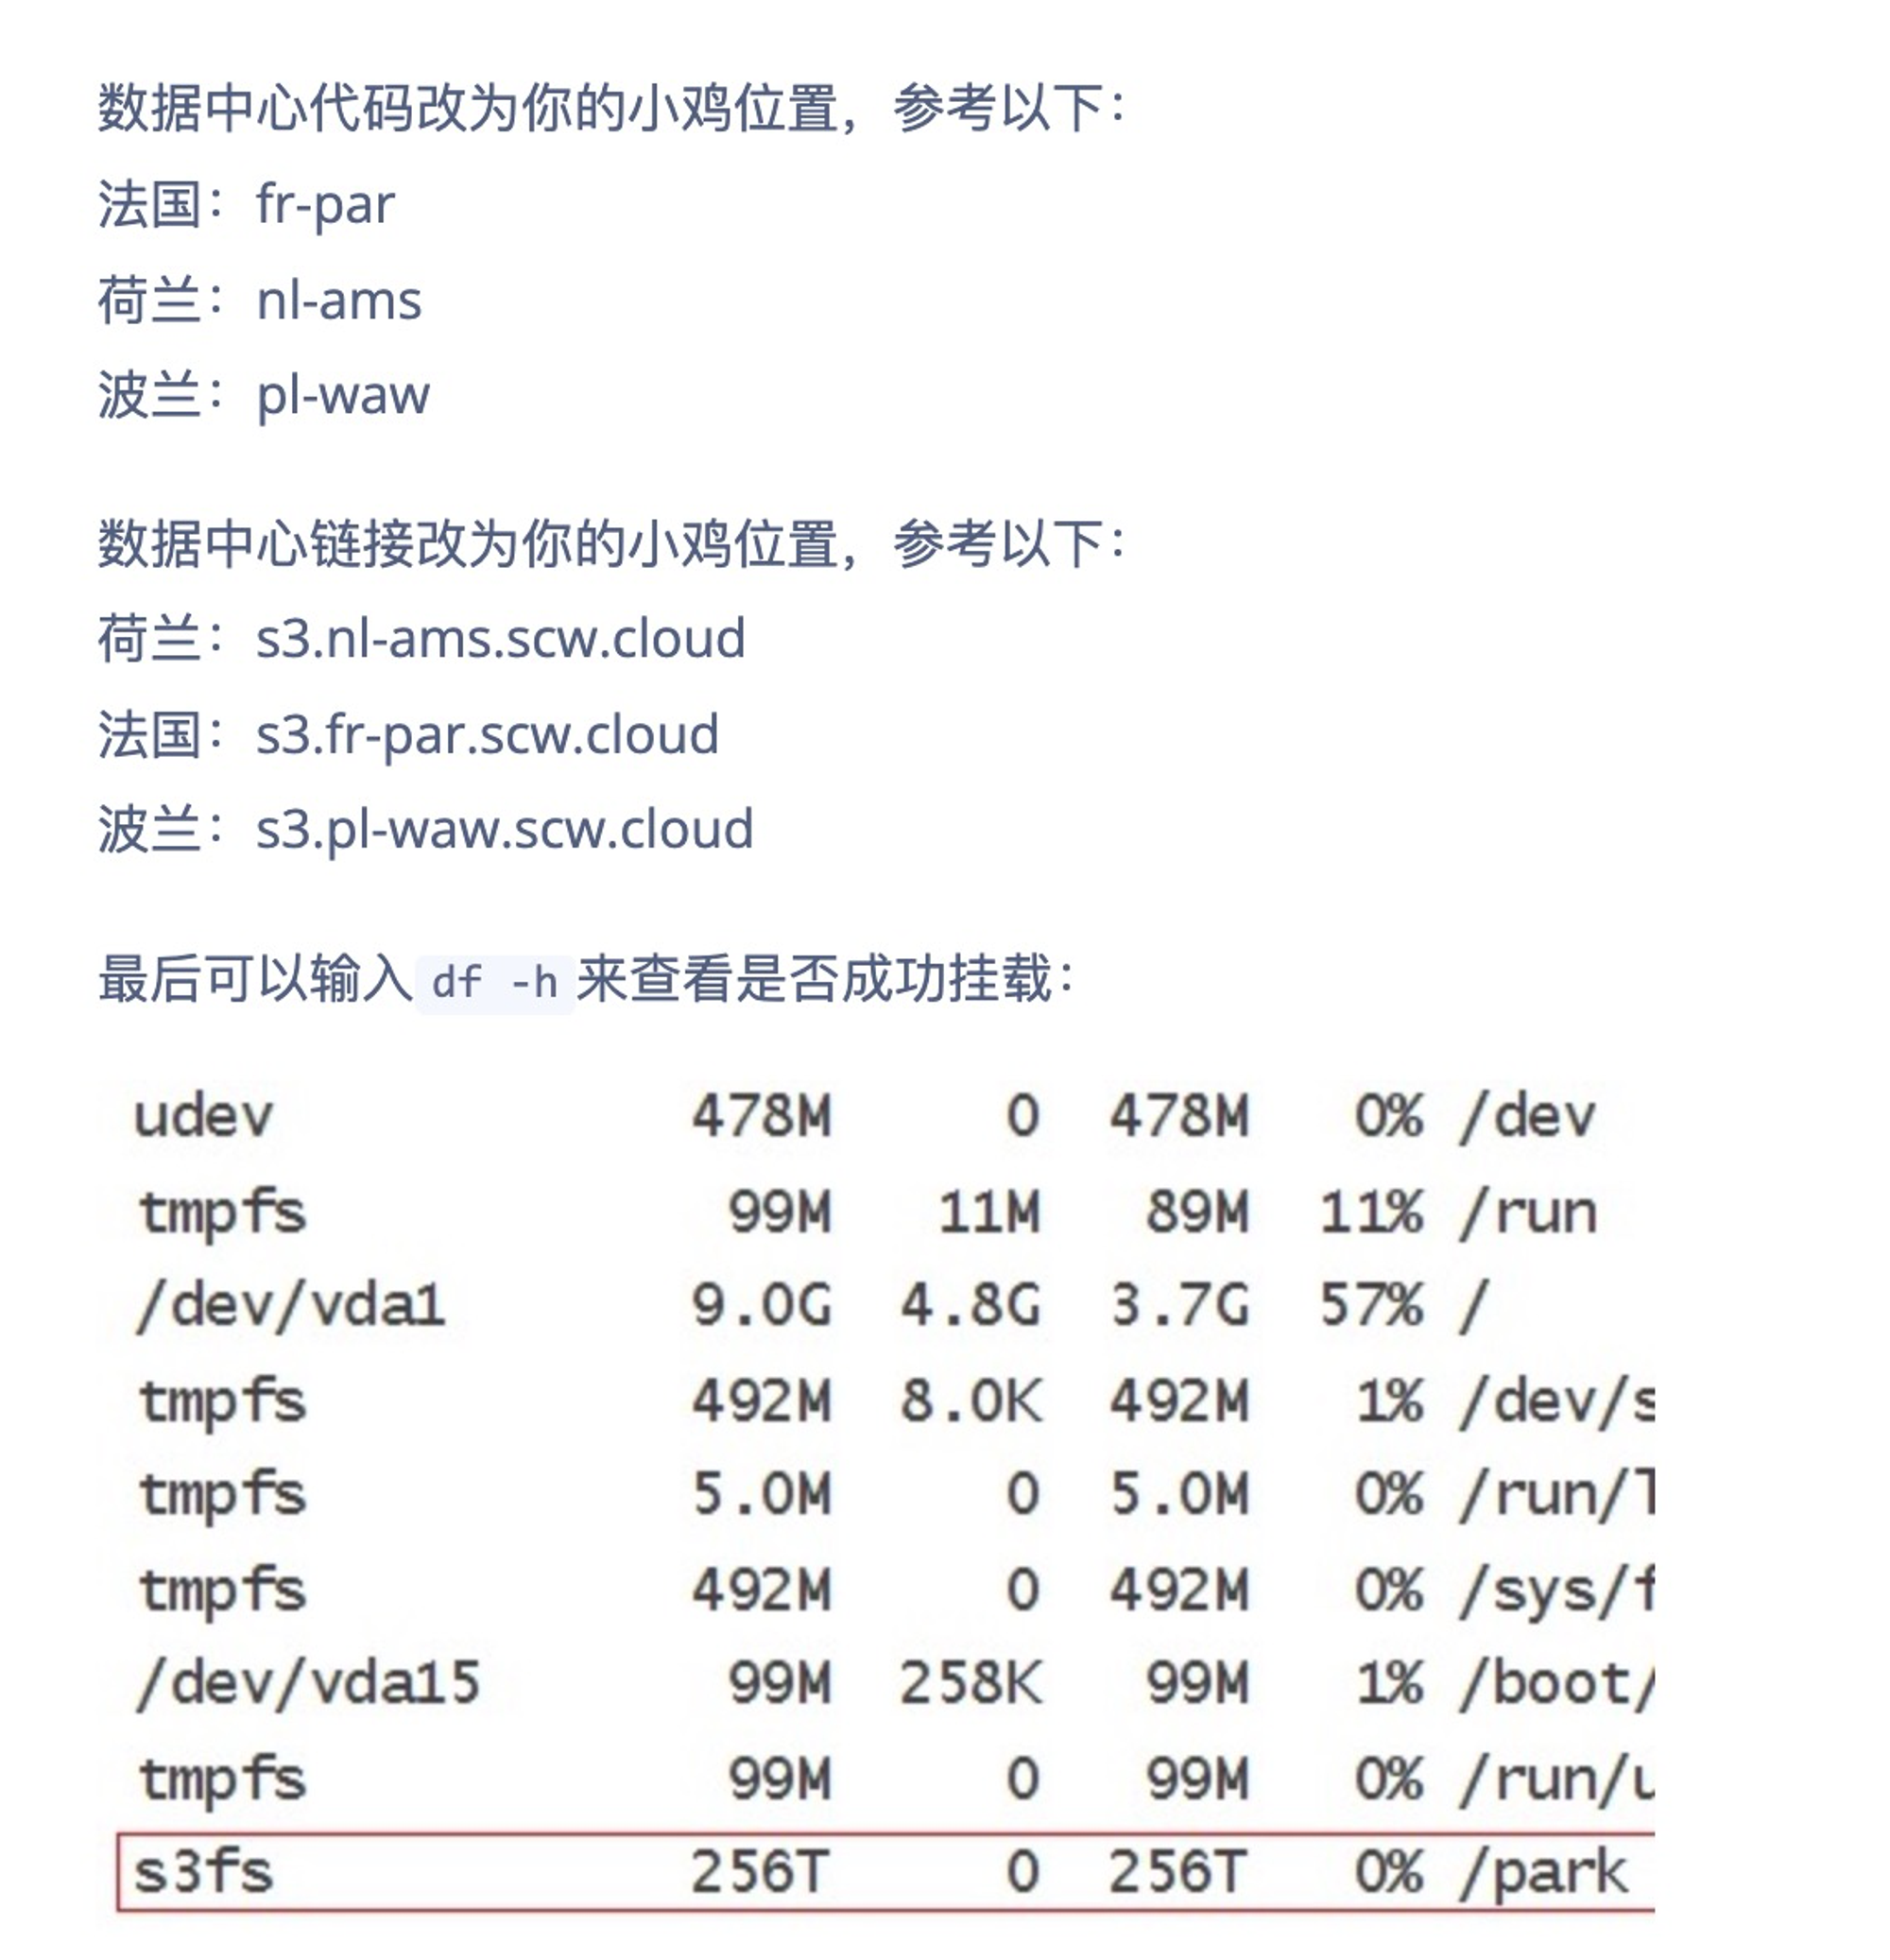
75G对象存储
- (2022_05_03) 3种类型 - Stanford 不免费,OneZone_IA有75G免费,Glacier也有75G免费,外网出口流量75G免费;内网流量全免费
# 在~/.config/rclone/rclone.conf中添加这些项即可

[scaleway_oss1_standardnotfree]
type = s3
provider = Scaleway
access_key_id = SCWP6DHP8-Your-Access-key
secret_access_key = 3192d379-5139-4abc-Your-Secret-Key
region = fr-par
endpoint = s3.fr-par.scw.cloud
acl = private
storage_class = STANDARD


# STANDARD / ONEZONE_IA / GLACIER


RCLONE_NAME='scaleway_free75_oss1'
mkdir /drive/$RCLONE_NAME && cd /drive/$RCLONE_NAME

cat > /etc/systemd/system/rclone_$RCLONE_NAME.service <<EOF
[Unit]
Description=rclone_$RCLONE_NAME

[Service]
User=root
# mount root folder of remote drive
# 根据磁盘大小设定 cache size (--vfs-cache-max-size 1G --vfs-cache-max-age 1h) 也可以只设定 max-age
# 如果用于bt下载和小硬盘的话, 建议比如Aria2当中concurrent download 变成1或2

# 本地硬盘如果够大的话
ExecStart=/usr/bin/rclone mount $RCLONE_NAME: /drive/$RCLONE_NAME --copy-links --no-gzip-encoding --no-check-certificate --allow-other --allow-non-empty --umask 000 --vfs-cache-mode writes --vfs-read-chunk-size 16M --vfs-cache-max-size 512M --vfs-cache-max-age 2h
# --daemon-timeout 30m
# --daemon

[Install]
WantedBy=multi-user.target
EOF

systemctl daemon-reload
systemctl enable --now rclone_$RCLONE_NAME.service